

How To Get Rid Of The Square On Your Iphone
Is an unwanted object ruining your iPhone photo? If so, don't worry! Removing objects is easy with the TouchRetouch editing app. In just a few seconds you can remove objects, people, skin blemishes, and power lines. Read on to discover how to use TouchRetouch to remove unwanted objects from your iPhone photos. The results will definitely be worth it!
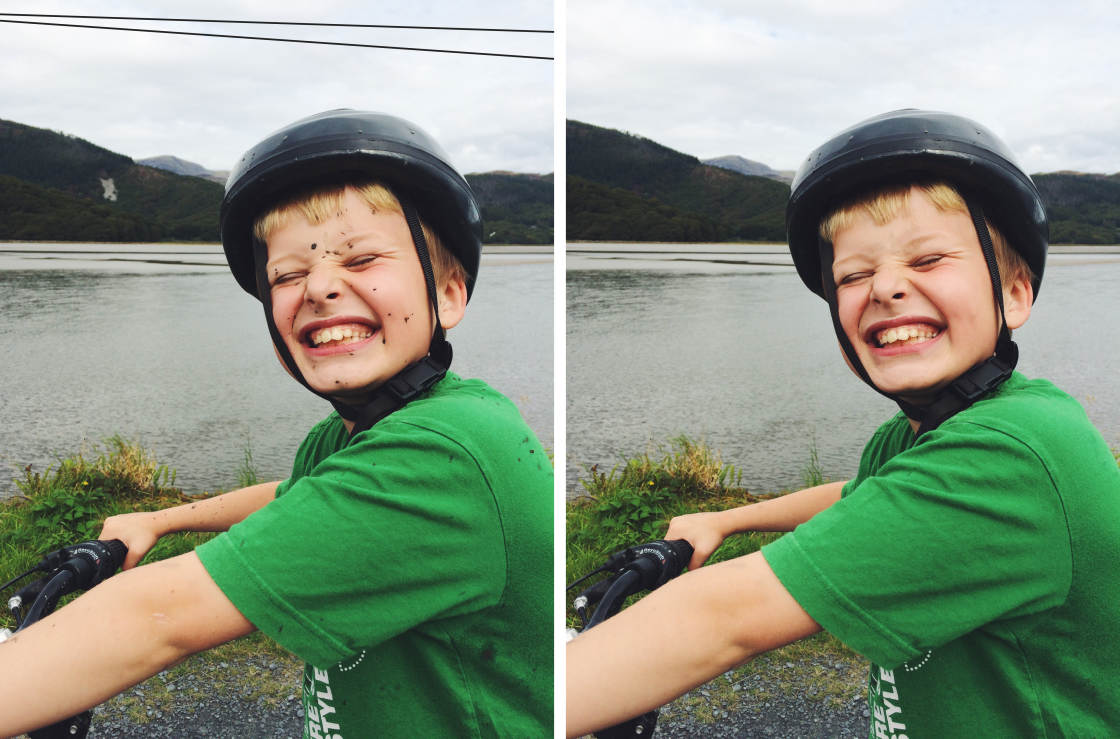
Table Of Contents: Removing Objects From Your iPhone Photos
Click any title link below to go straight to that section of the article:
1. Quickly Remove Object From Your Photo
2. Remove Blemishes From A Portrait Photo
3. Remove Unwanted Lines From Your Image
4. Remove Large Or Irregular-Shaped Objects
5. Clone Detail From One Area To Another
6. Top Tips For Removing Objects Accurately
You can download the TouchRetouch app for $1.99 from the App Store.
1. Quickly Remove Object From Your Photo
The TouchRetouch app has several tools for removing objects from your photos.
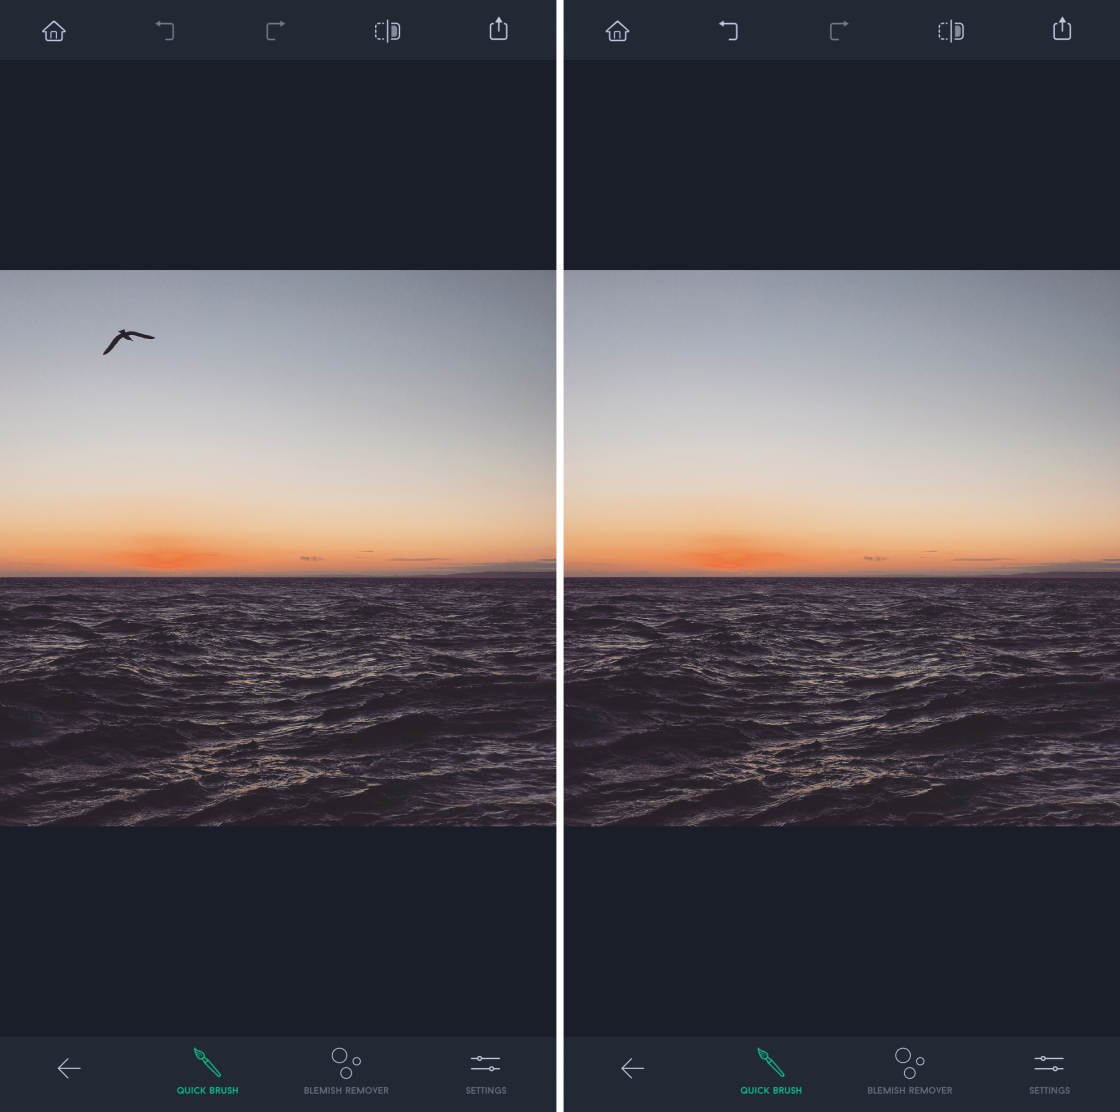
But the quickest and easiest option is the Quick Brush tool. You simply brush over the object and it disappears!
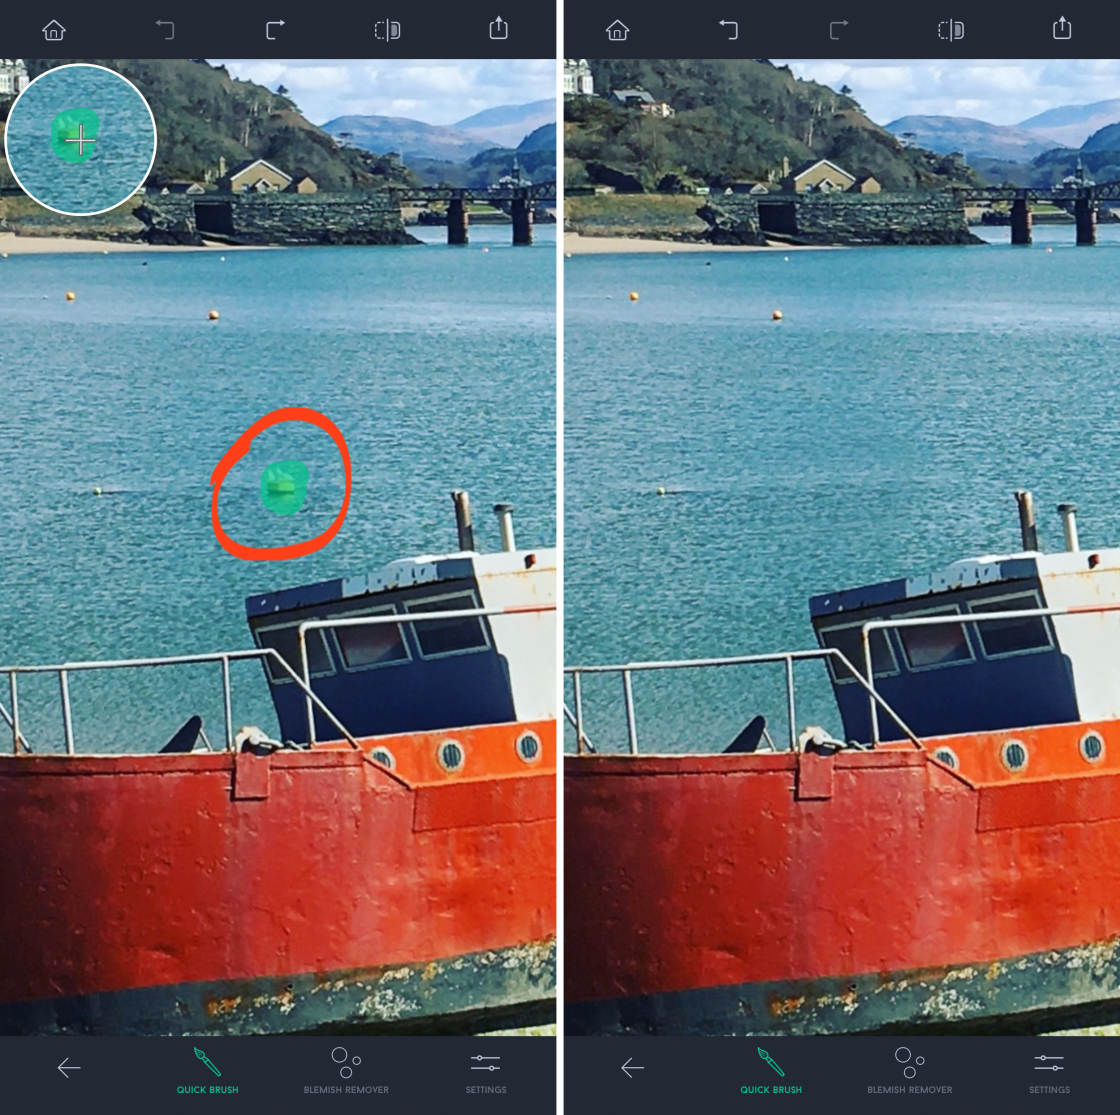
This tool works best for removing small objects, or objects surrounded by empty space, such as sky or water.
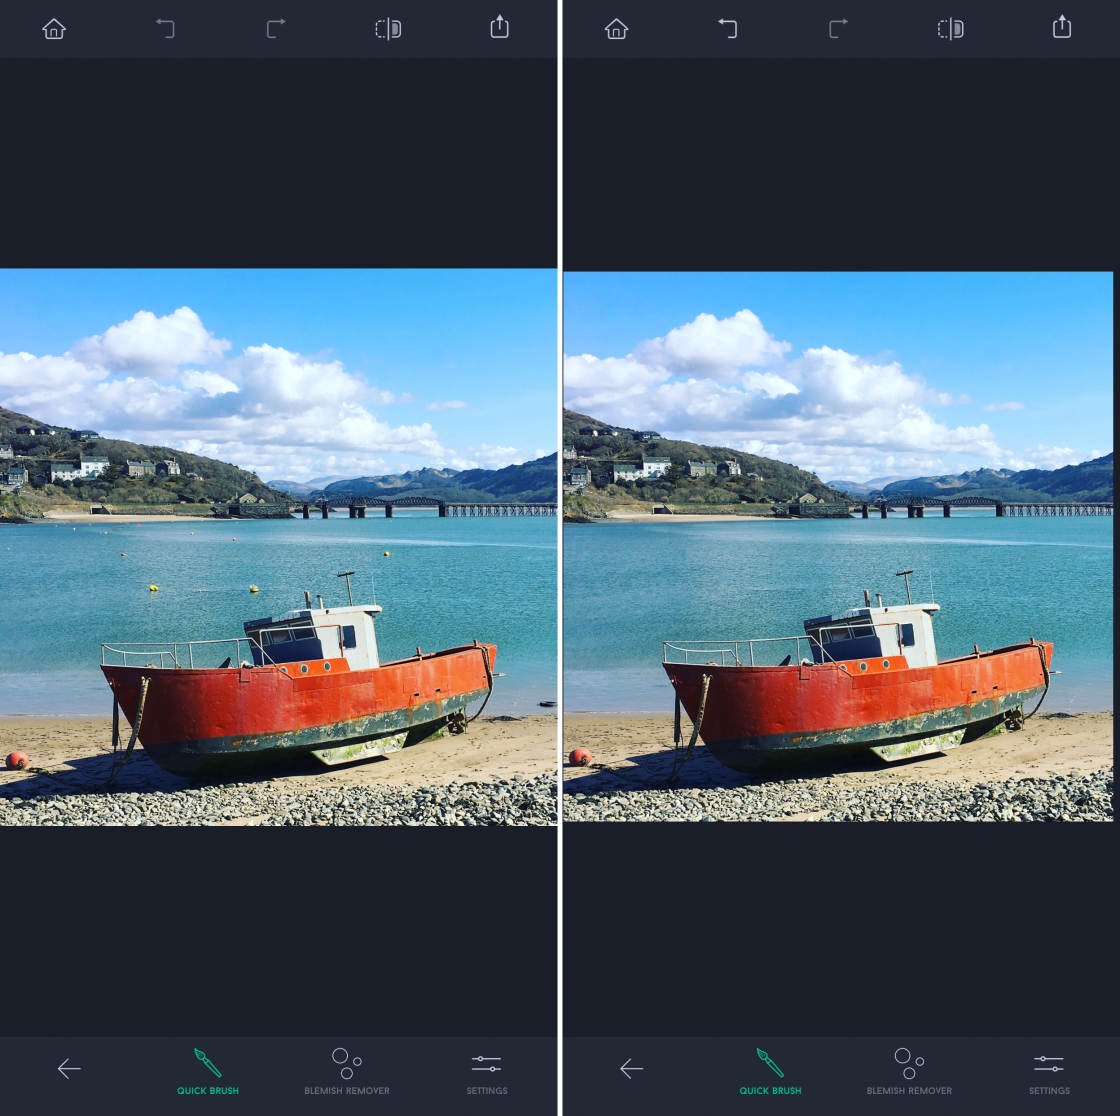
In the example below, the colorful buoys have been removed from the water to create a cleaner, clutter-free image. The first photo is the original, and the second is the edited version with objects removed.


Here's how to edit something out of a picture using the Quick Brush tool:
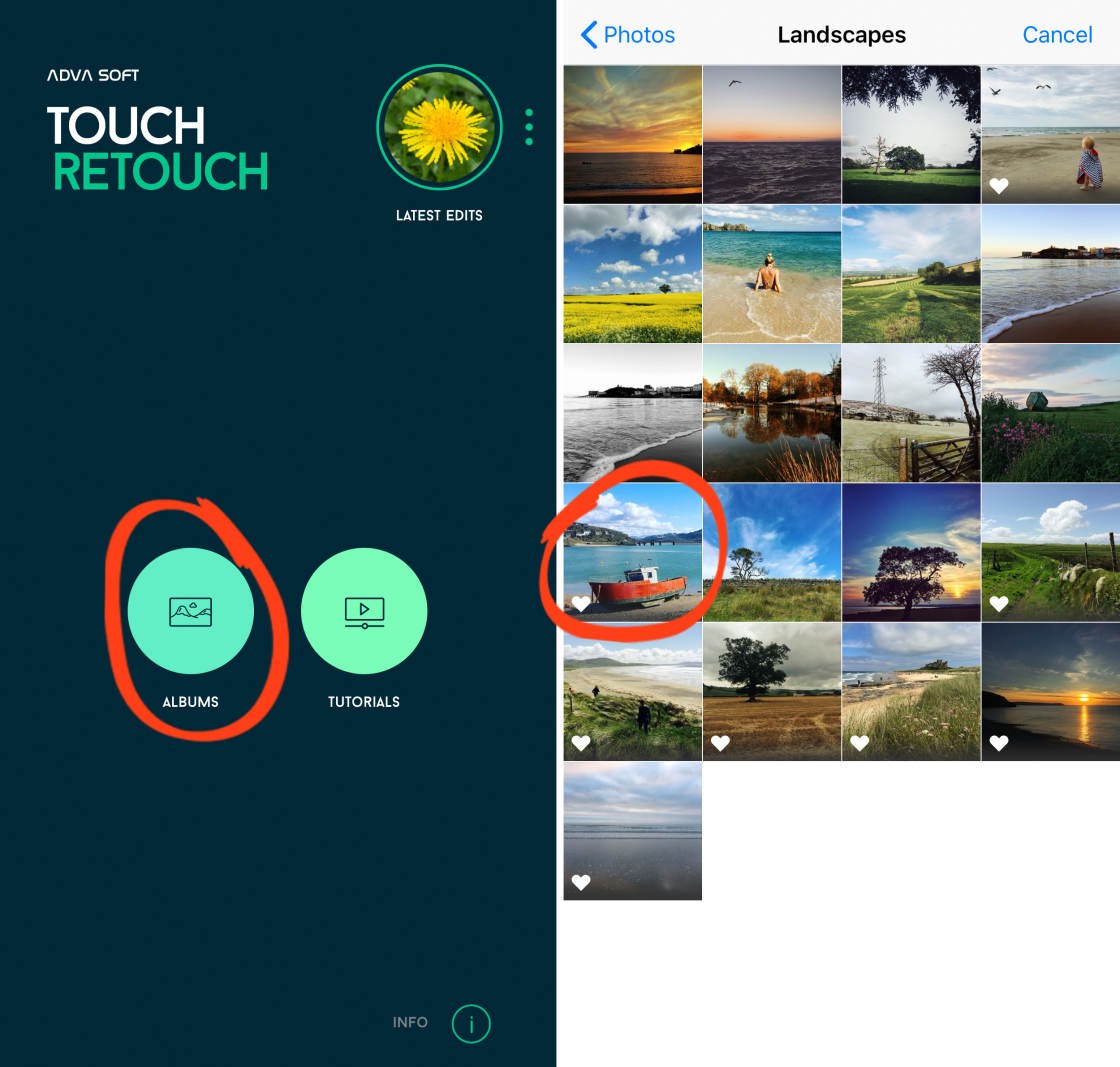
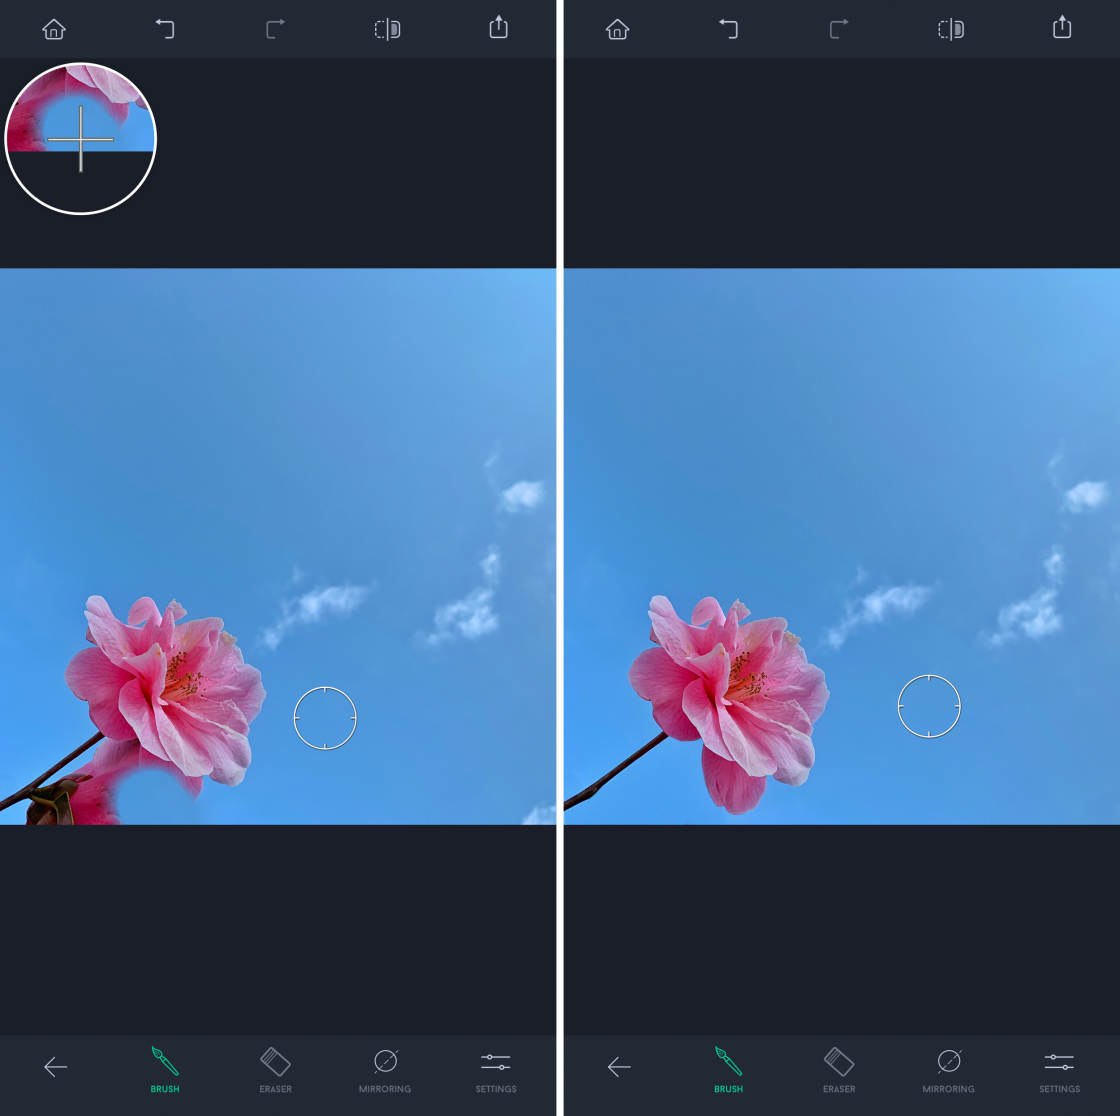
Open the TouchRetouch app, and tapAlbums. Locate the photo you want to edit, then tap the photo to open it.
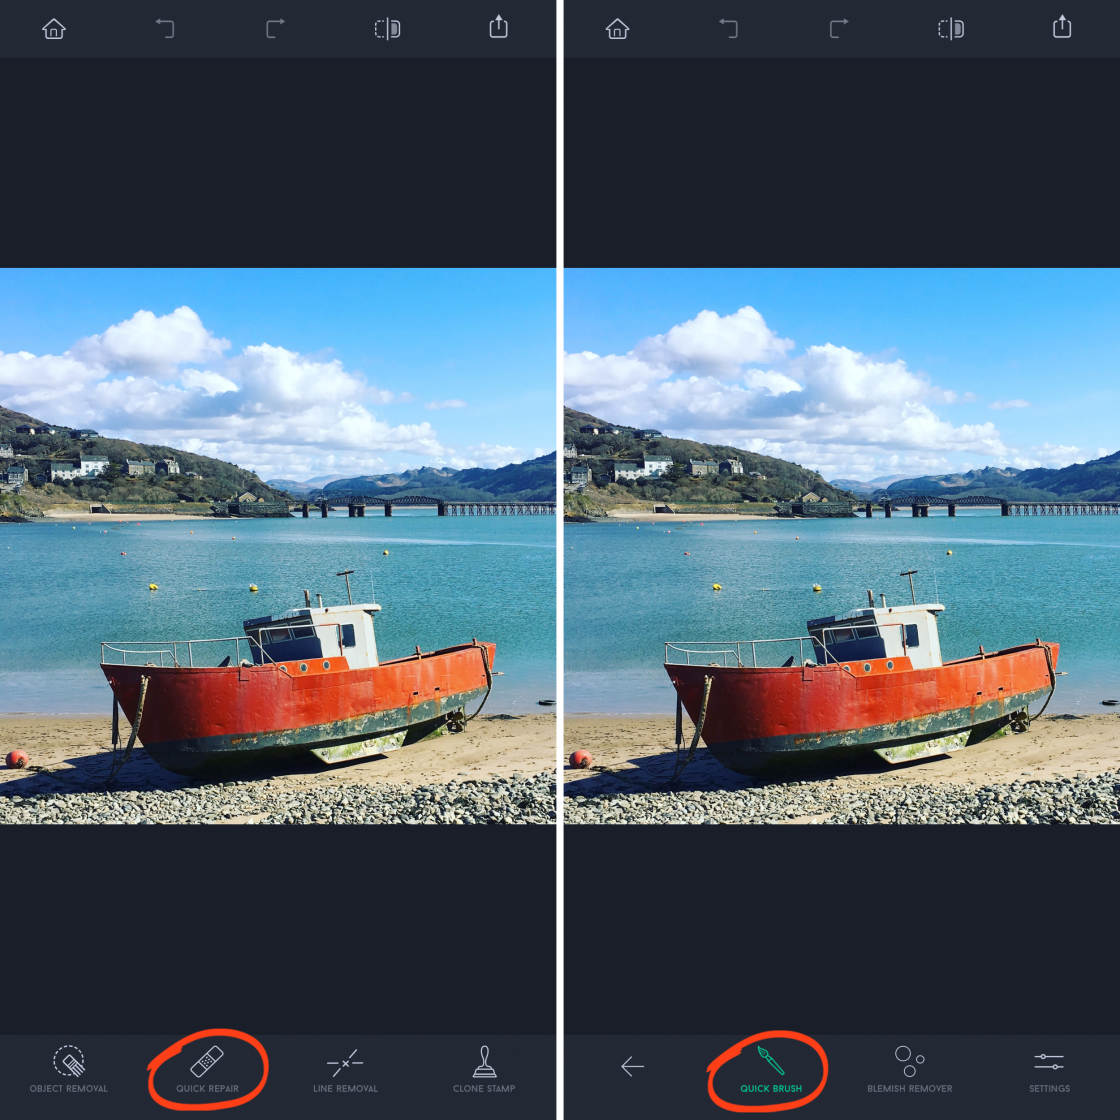
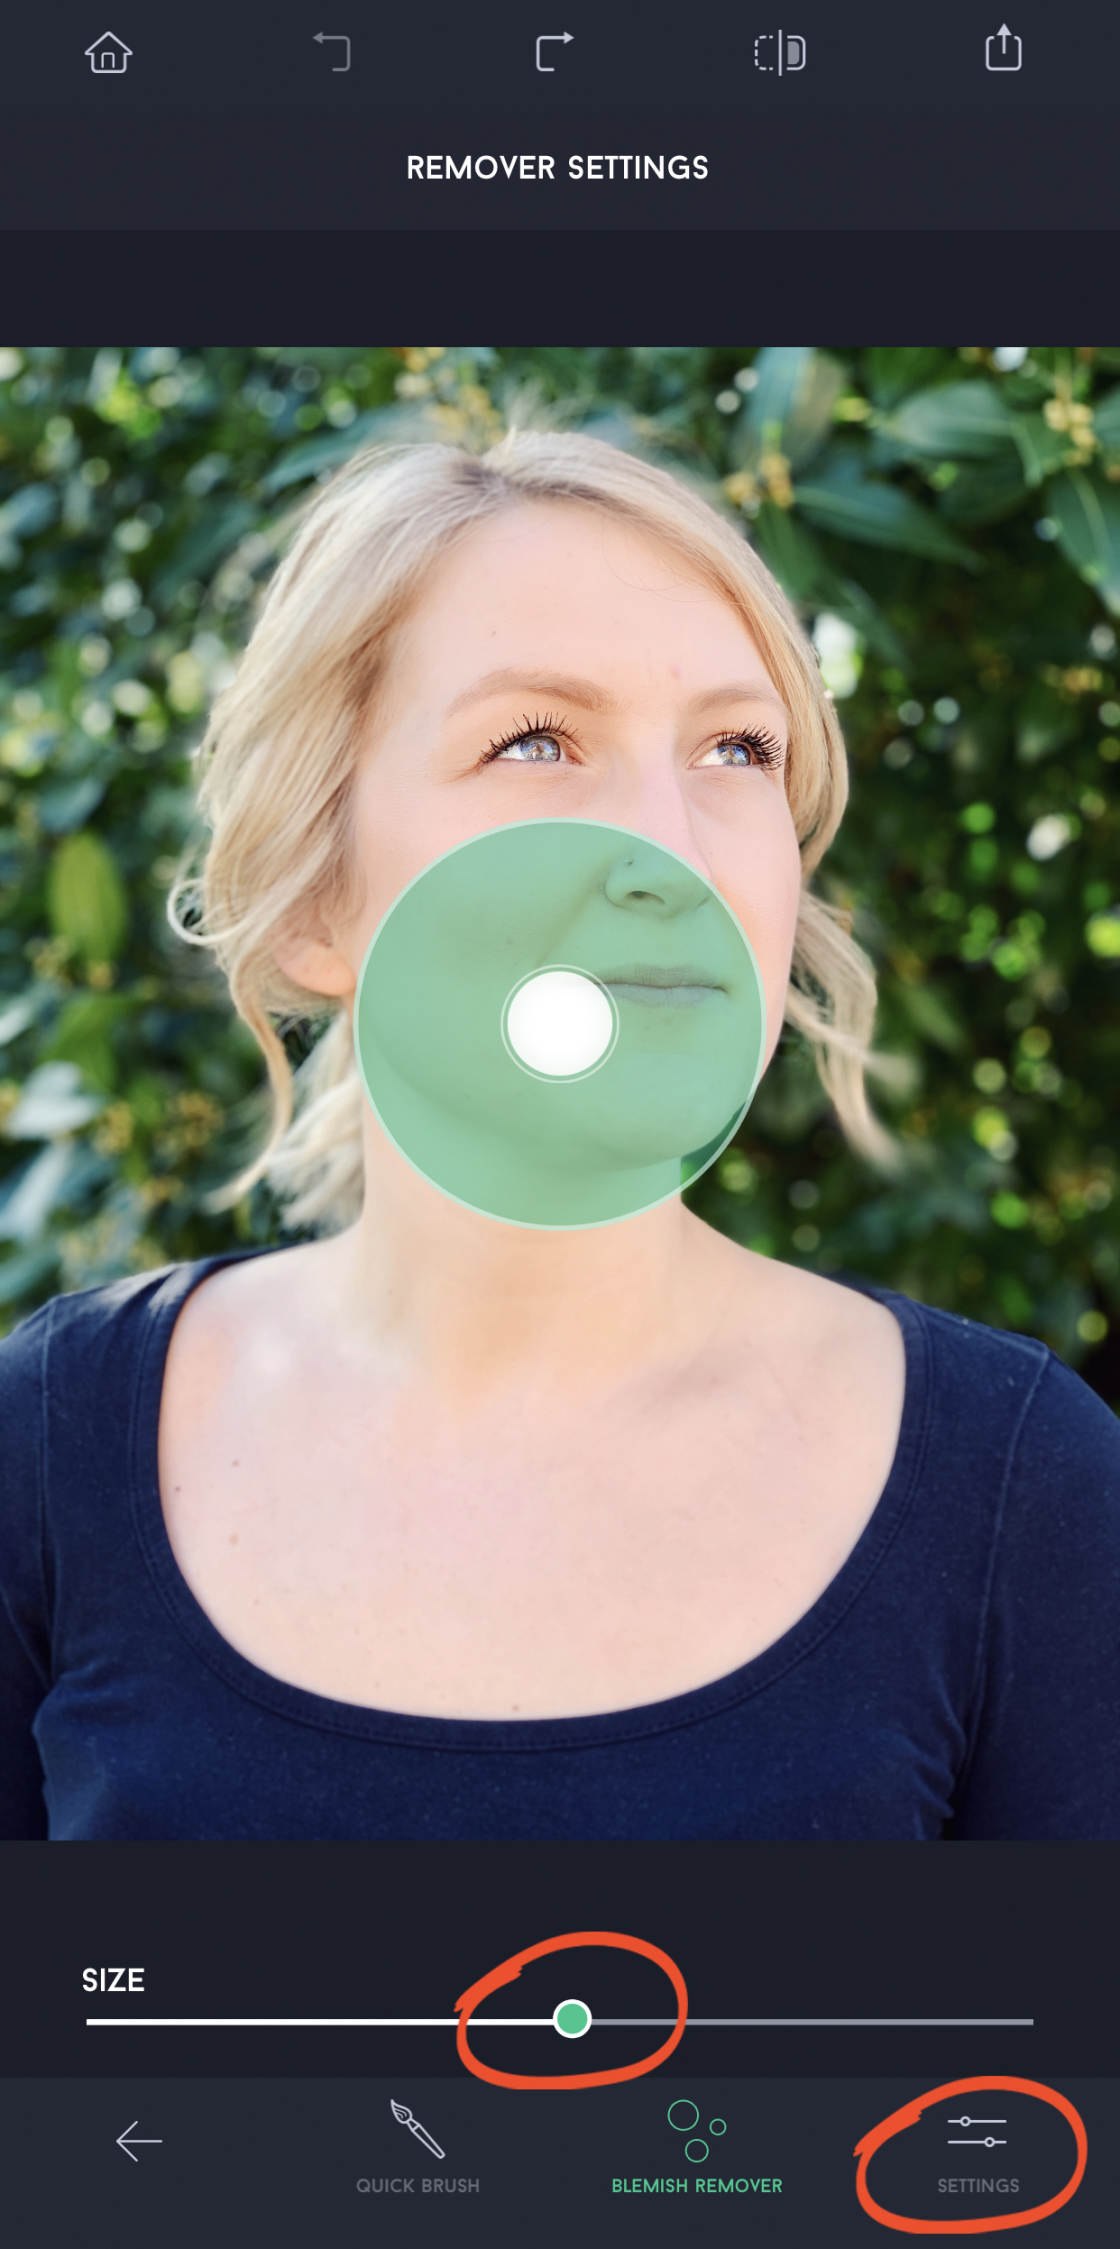
Tap Quick Repair at the bottom of the screen. Then ensure theQuick Brush tool is selected.
If you wish, you can tap Settings and use the Size slider to adjust the size of the brush. The brush is the white circle inside the green circle.
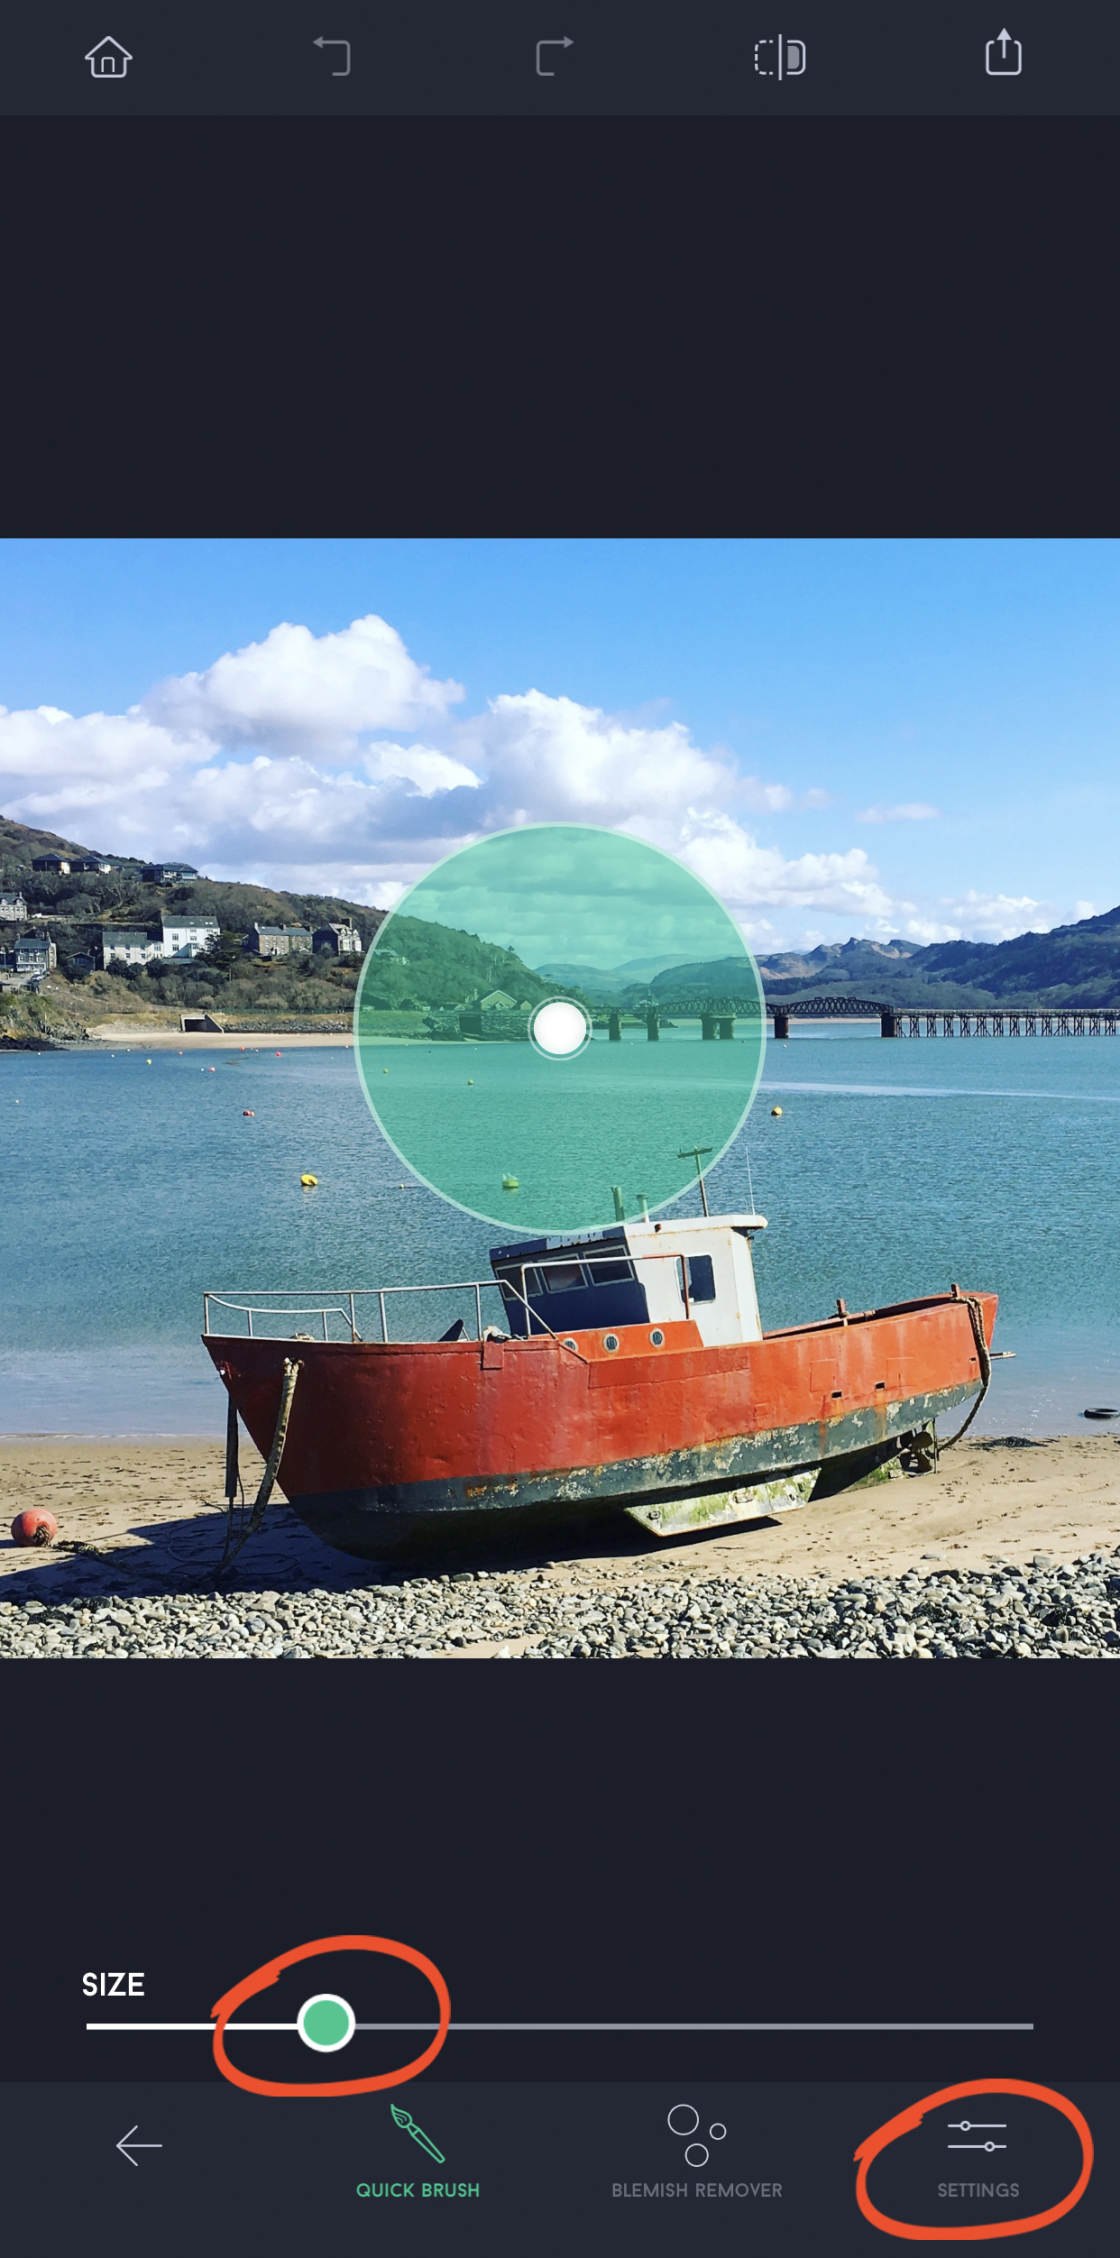
It's also a good idea to zoom in on the object you want to remove – especially if the object is small. This will ensure an accurate selection of the object.
To zoom in, place two fingers on the screen, then drag your fingers apart. You can pan to a different part of the image by dragging with two fingers.
Now, simply use your finger to brush over the object you want to remove.
Because your finger is covering the area you're selecting, you won't be able to see the object under your finger. So whenever you touch the screen, you'll see a white circle which shows the area you're selecting.
The selected area will appear green. When you release your finger the object will disappear!
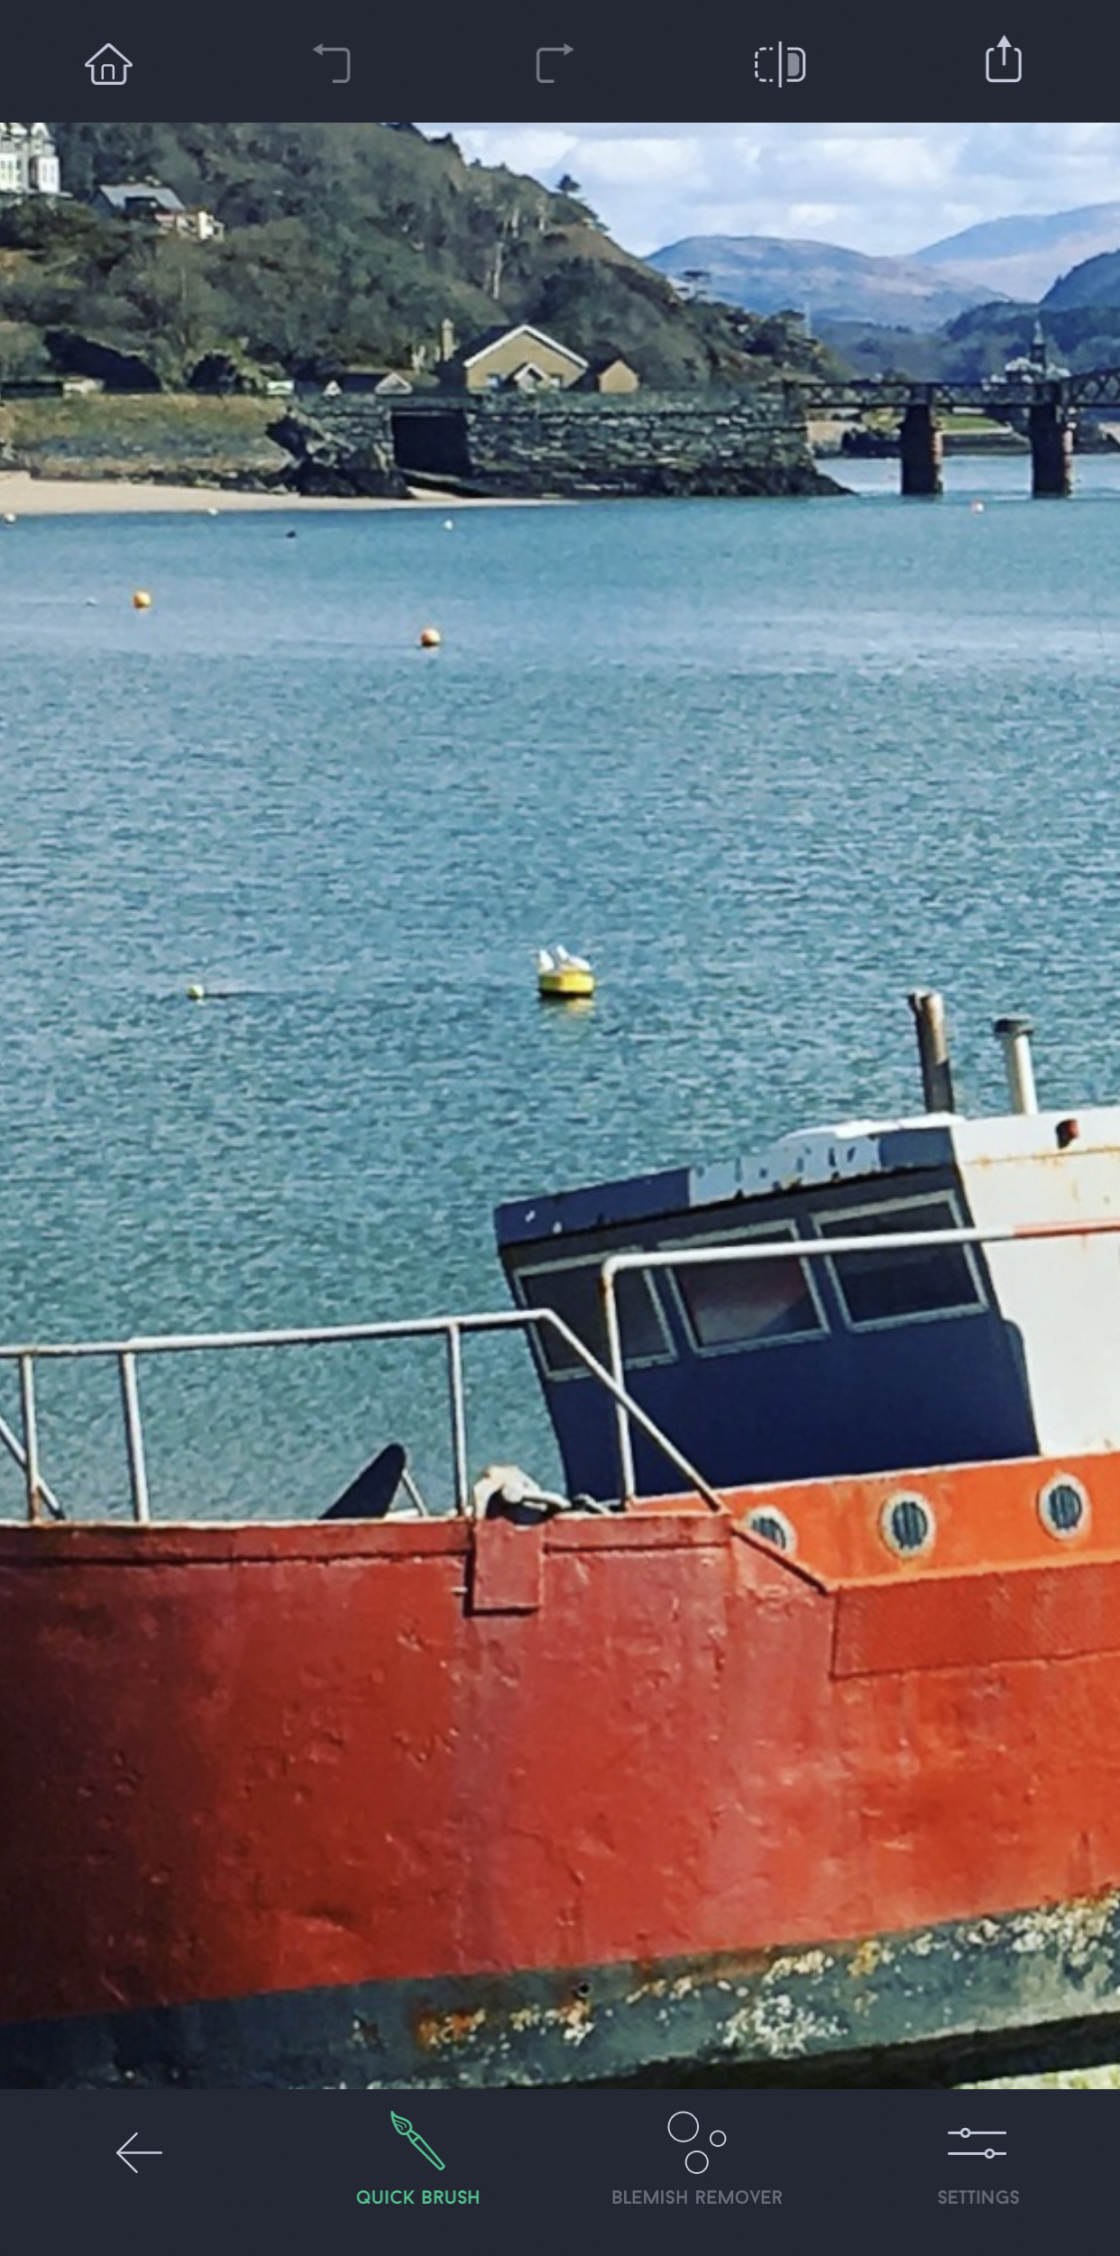
You'll notice that the object is replaced by pixels from the surrounding area. So in this case, the buoy has been replaced by pixels from the surrounding water.
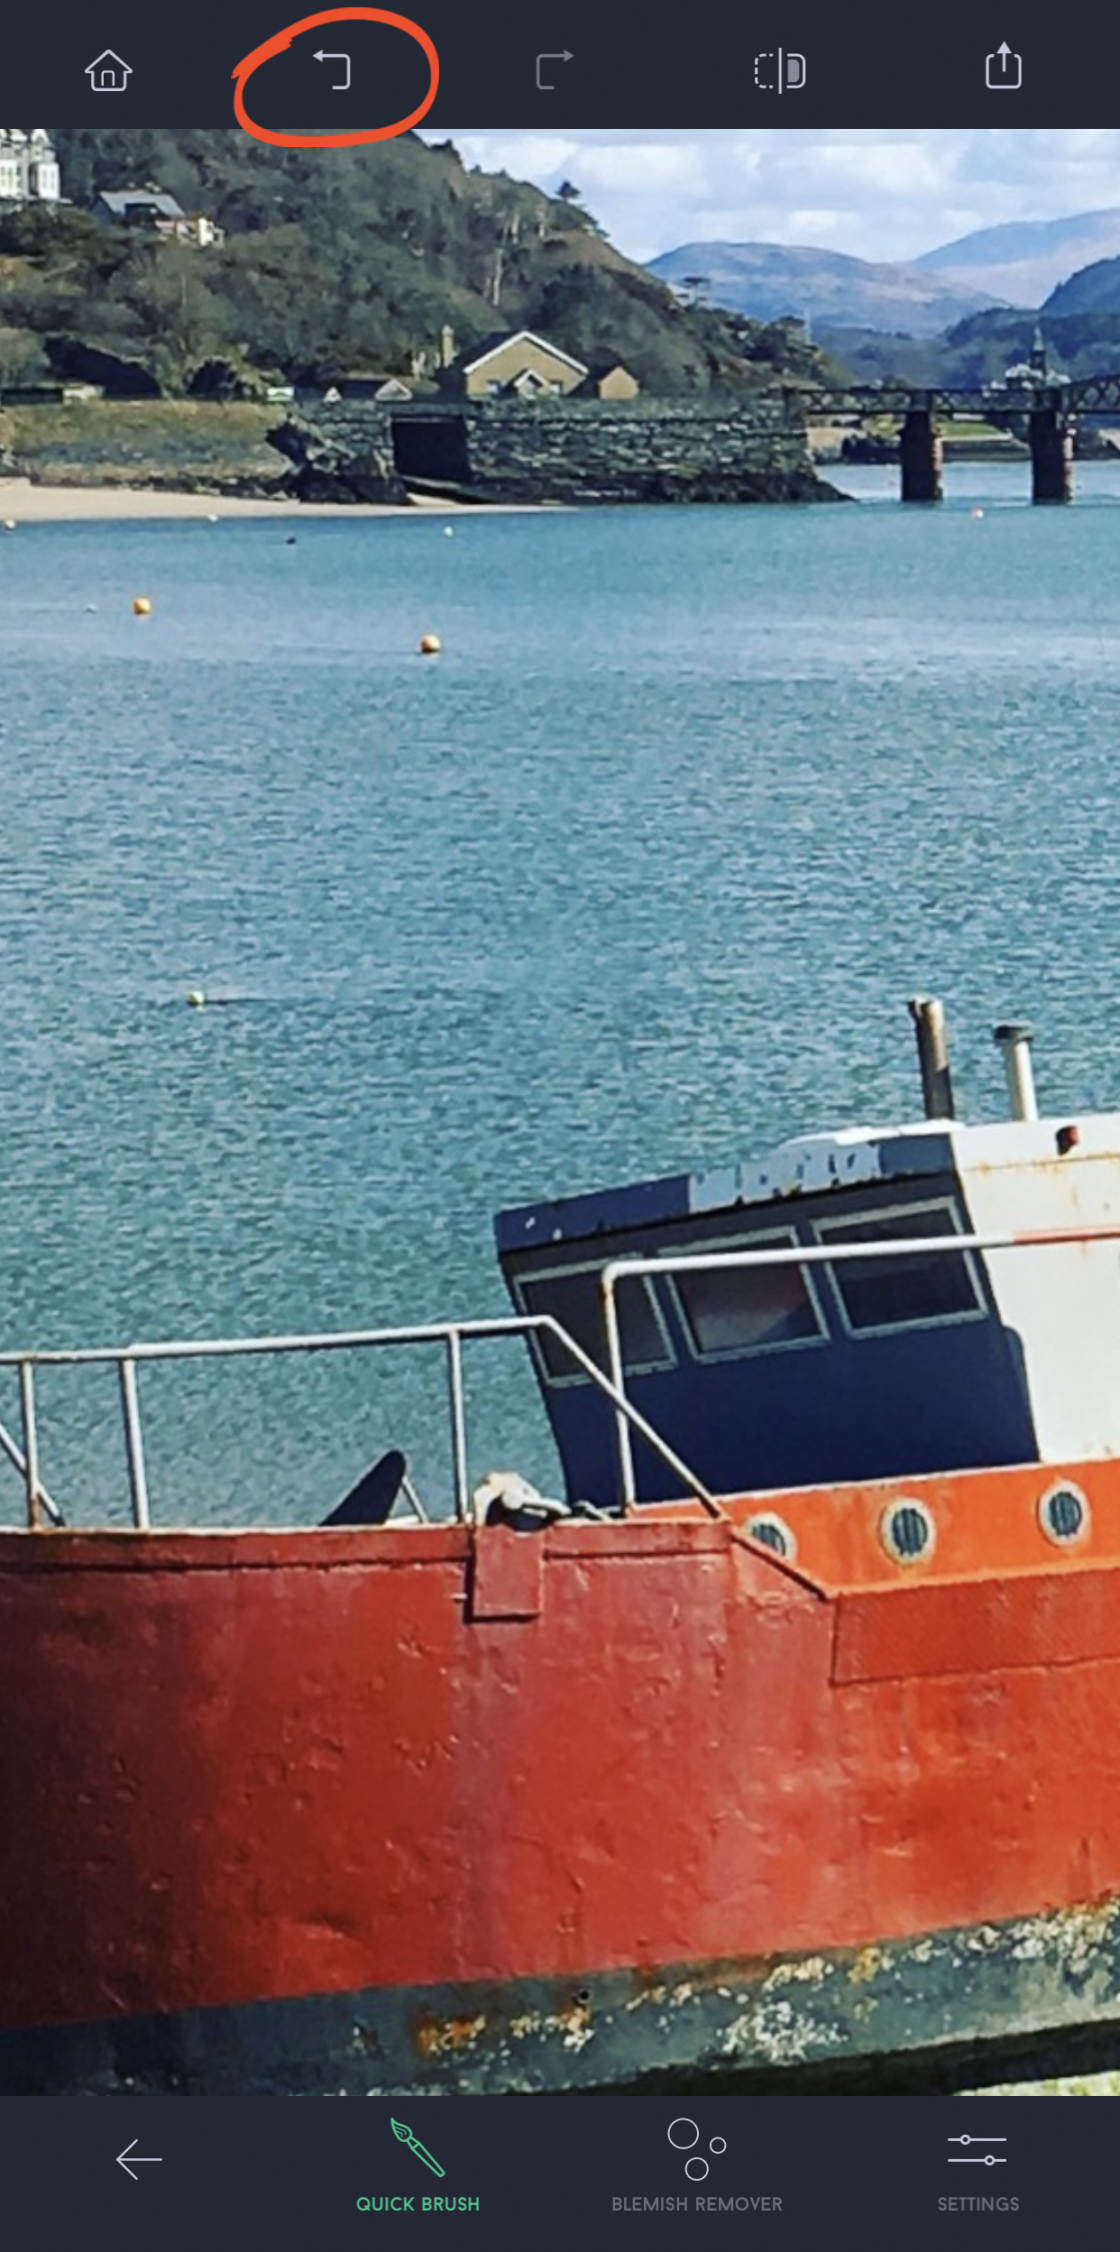
In most cases, the app will do a great job of removing the object. But if you're not happy with the result, tapUndo (back arrow) at the top of the screen. Then try brushing over the object again.
You can keep brushing over other areas to remove as many objects as you want. In the example below, all of the colorful buoys in the water have been removed.
When you're happy with the result, you'll need to save your image.
To save, tap the Export icon (square with up arrow) at the top right. Then tapSave As Copy.
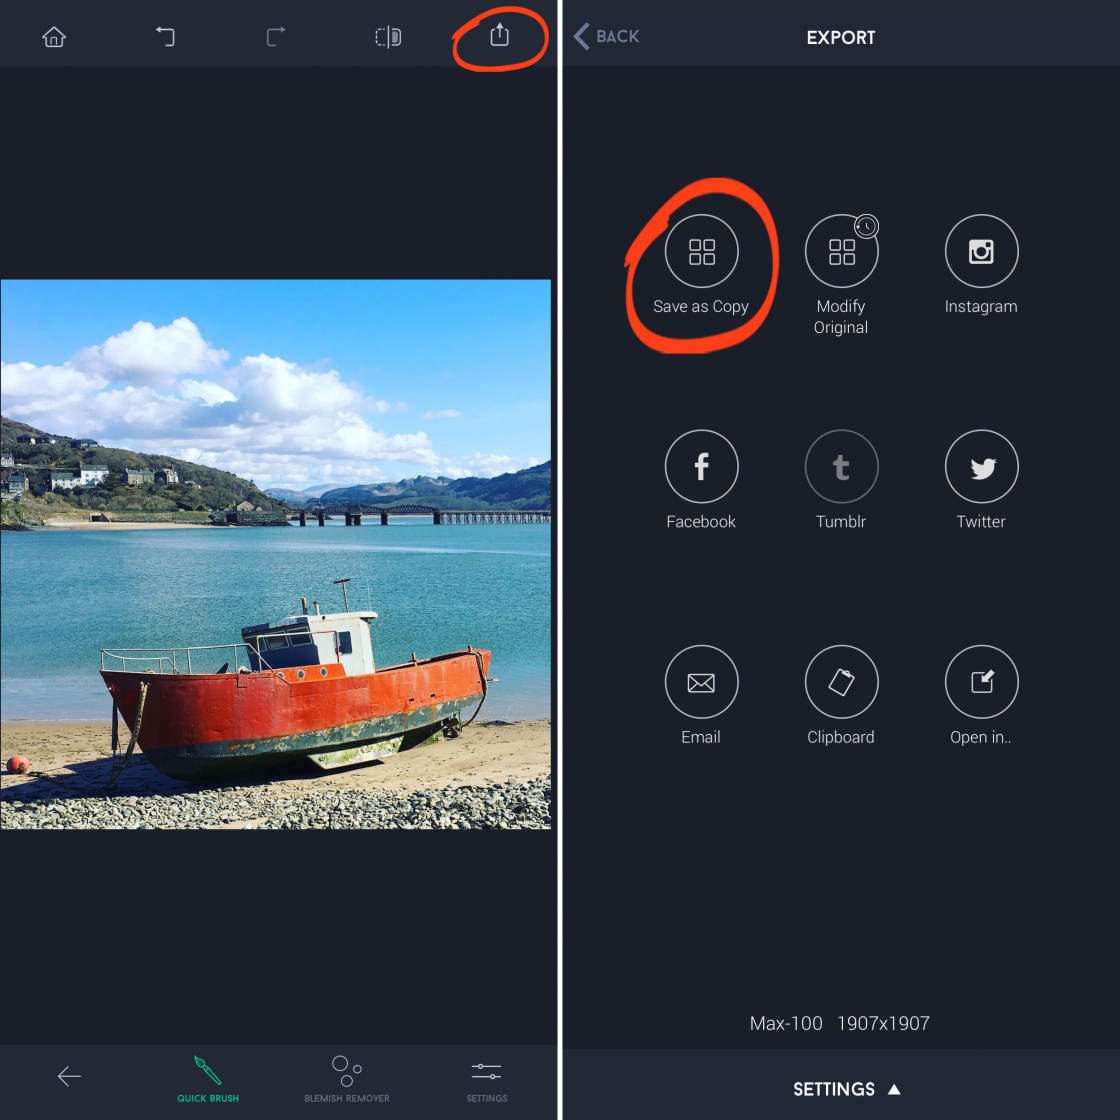
Your edited image will be saved to the Photos app on your iPhone.
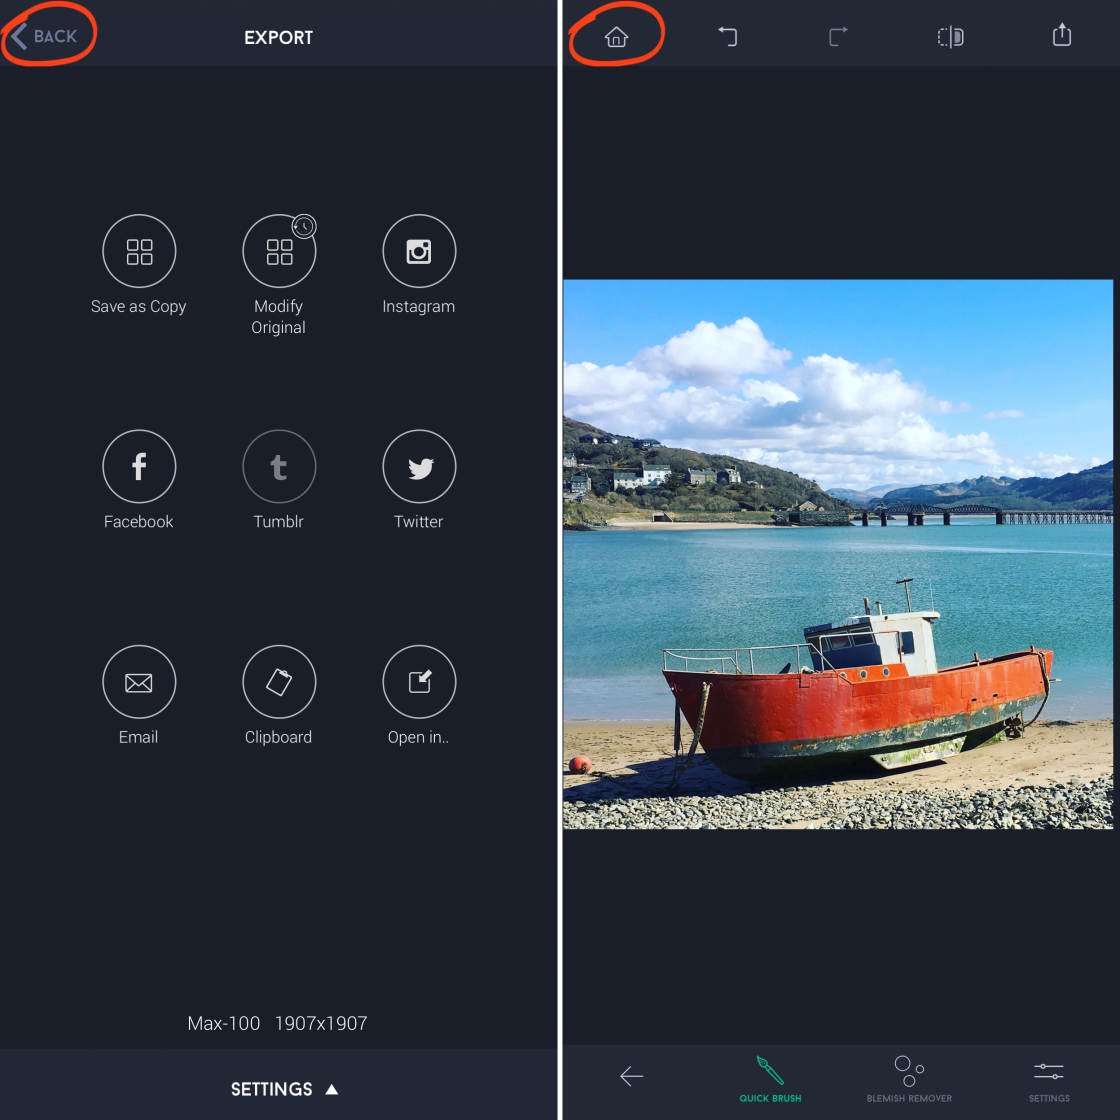
TapBack at the top left to exit the Export screen. Then tap the Home icon to select another image to edit.
2. Remove Blemishes From A Portrait Photo
Could your portrait photos be improved by removing pimples or imperfections from your subject's skin?
The Blemish Remover tool in TouchRetouch makes it easy to create flawless portraits.
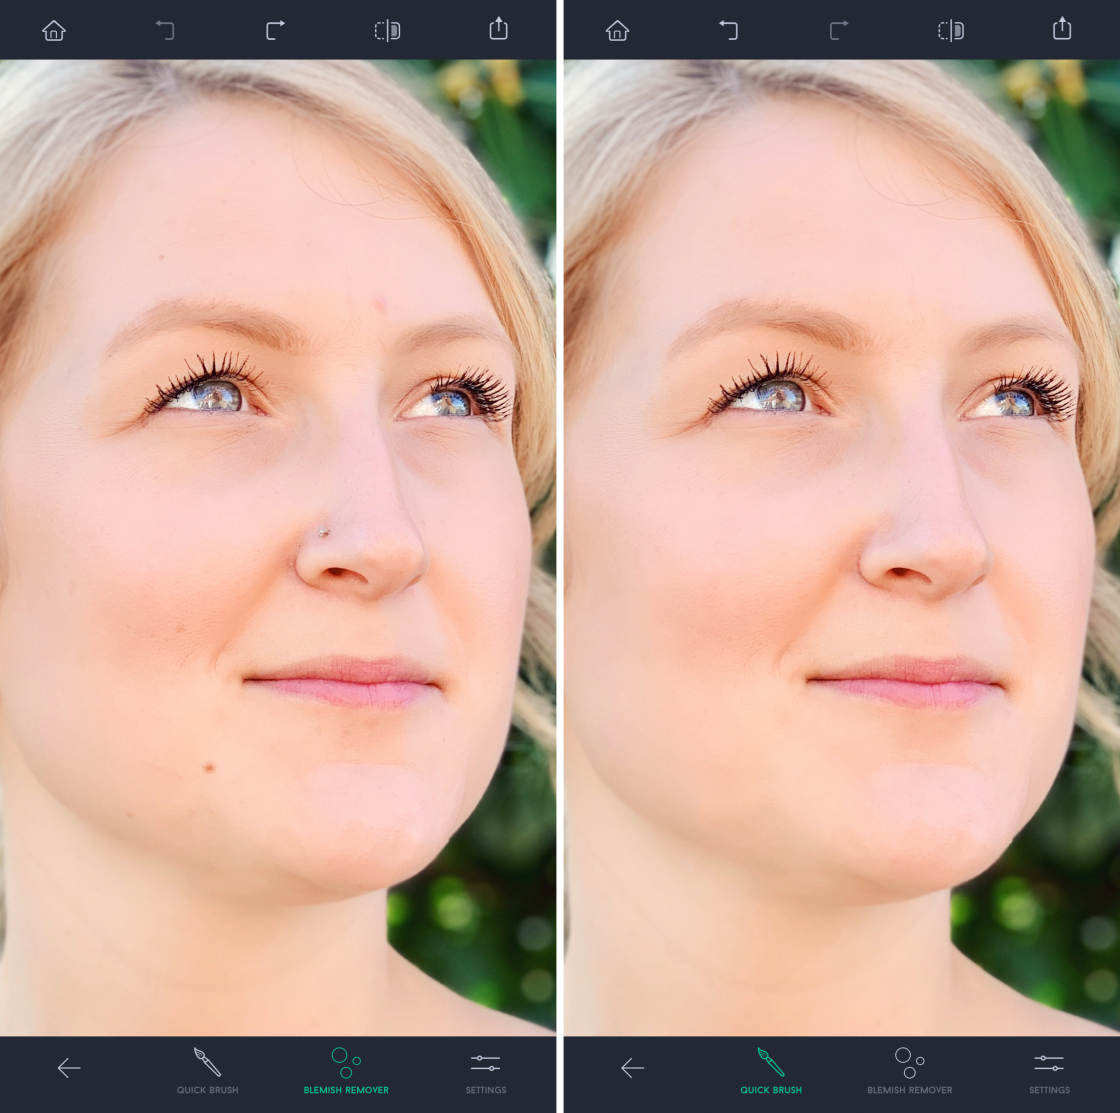
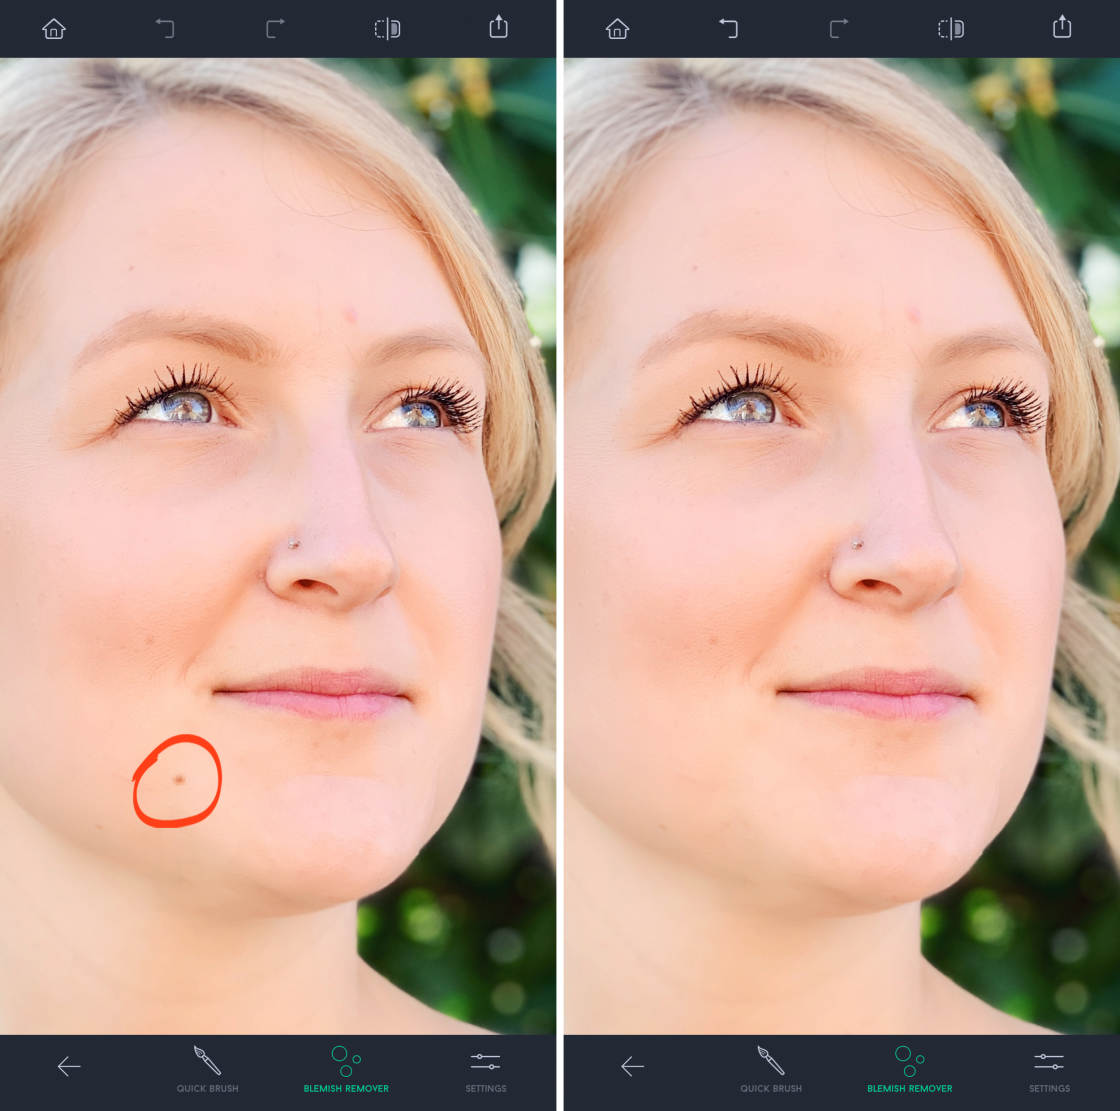
In the example below, the skin blemishes have been removed. The first photo is the original, and the second is the edited version with blemishes removed.


To remove blemishes from a portrait, open the image in TouchRetouch.
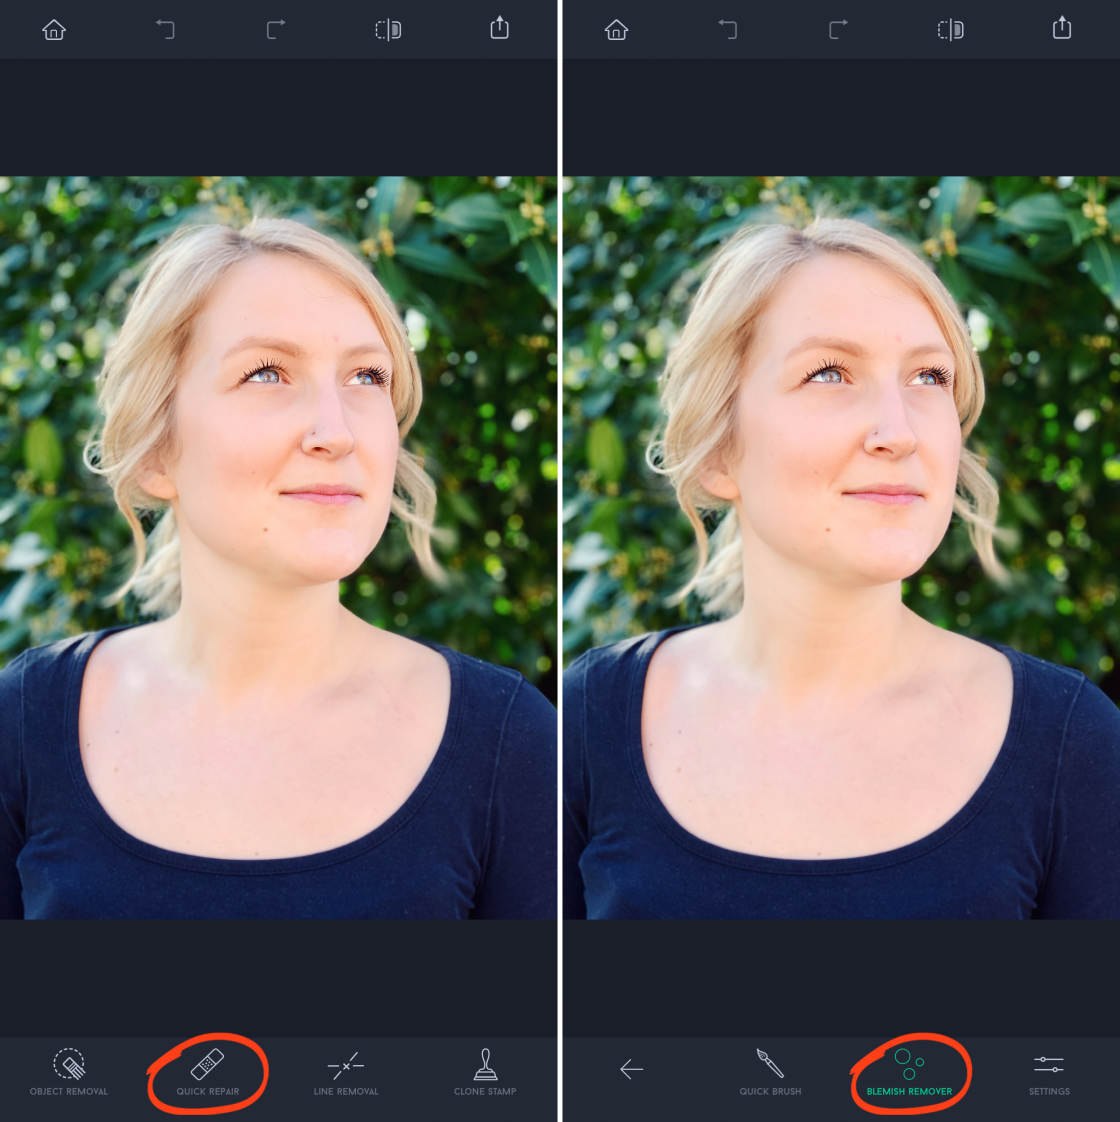
Tap Quick Repair at the bottom of the screen, then select the Blemish Remover tool.
Tap Settings at the bottom right and use the Size slider to adjust the size of the brush. The brush should be slightly bigger than the blemish you want to remove.
Zoom in, then tap on the blemish you want to remove. As soon as you release your finger, the blemish will disappear!
If the Blemish Remover tool struggles to remove a particular imperfection, switch to theQuick Brush tool. Then brush over the area you want to remove.
In the example below, you can see that several pimples and freckles have been removed from the subject's face.
When you're happy with the edit, tap the Export icon at the top right, then tap Save As Copy.

TapBack at the top left to exit the Export screen. Then tap the Home icon to select another image to edit.
3. Remove Unwanted Lines From Your Image
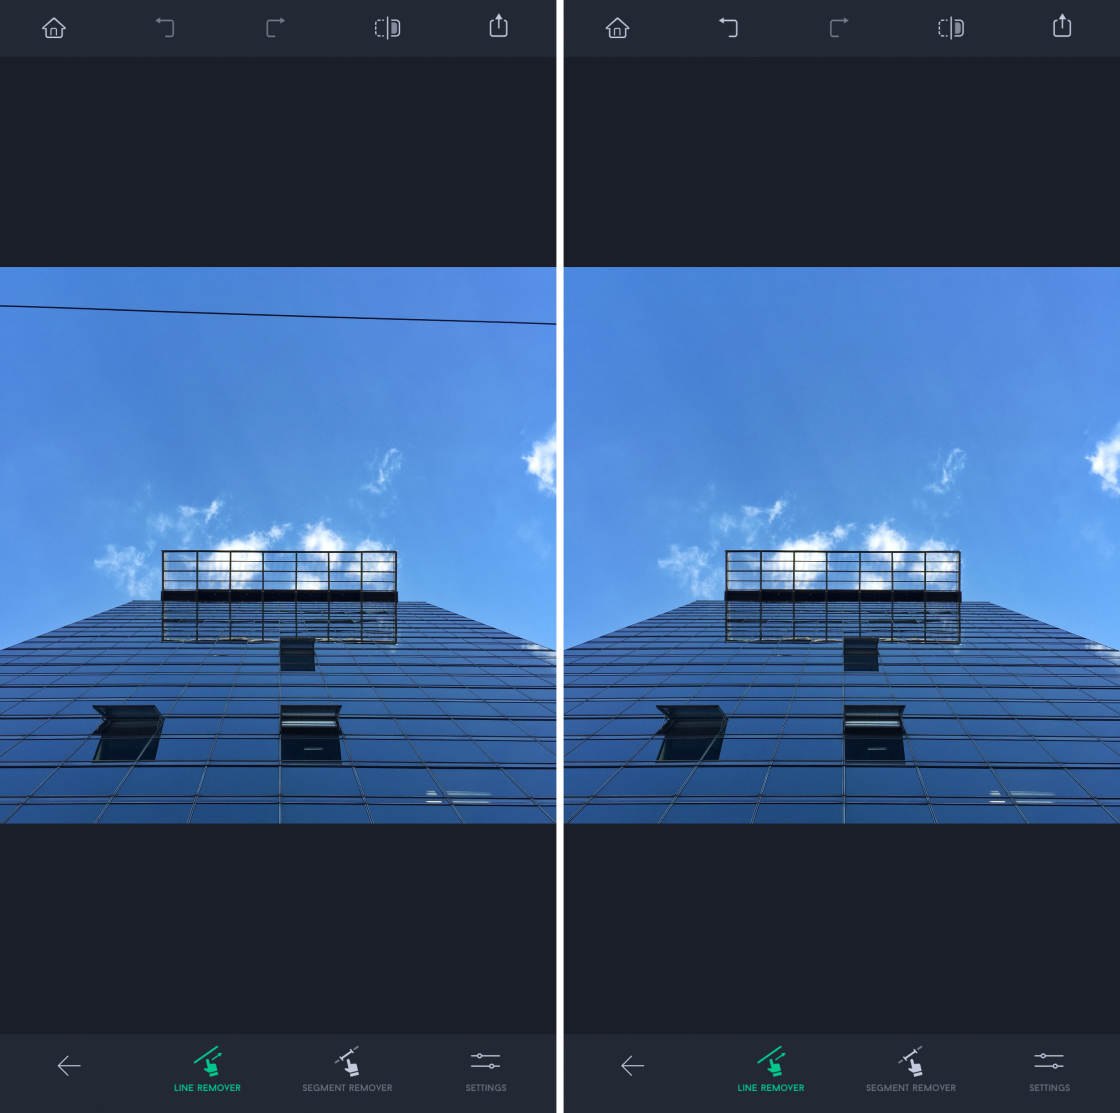
Is your beautiful landscape photo ruined by a power line or telegraph pole?
Does your portrait subject want you to get rid of their wrinkles or a scar?
You can easily fix these problems with the Line Removal tool.

This tool uses innovative technology to recognize and remove lines – whether they're thick, thin, straight, or curved.
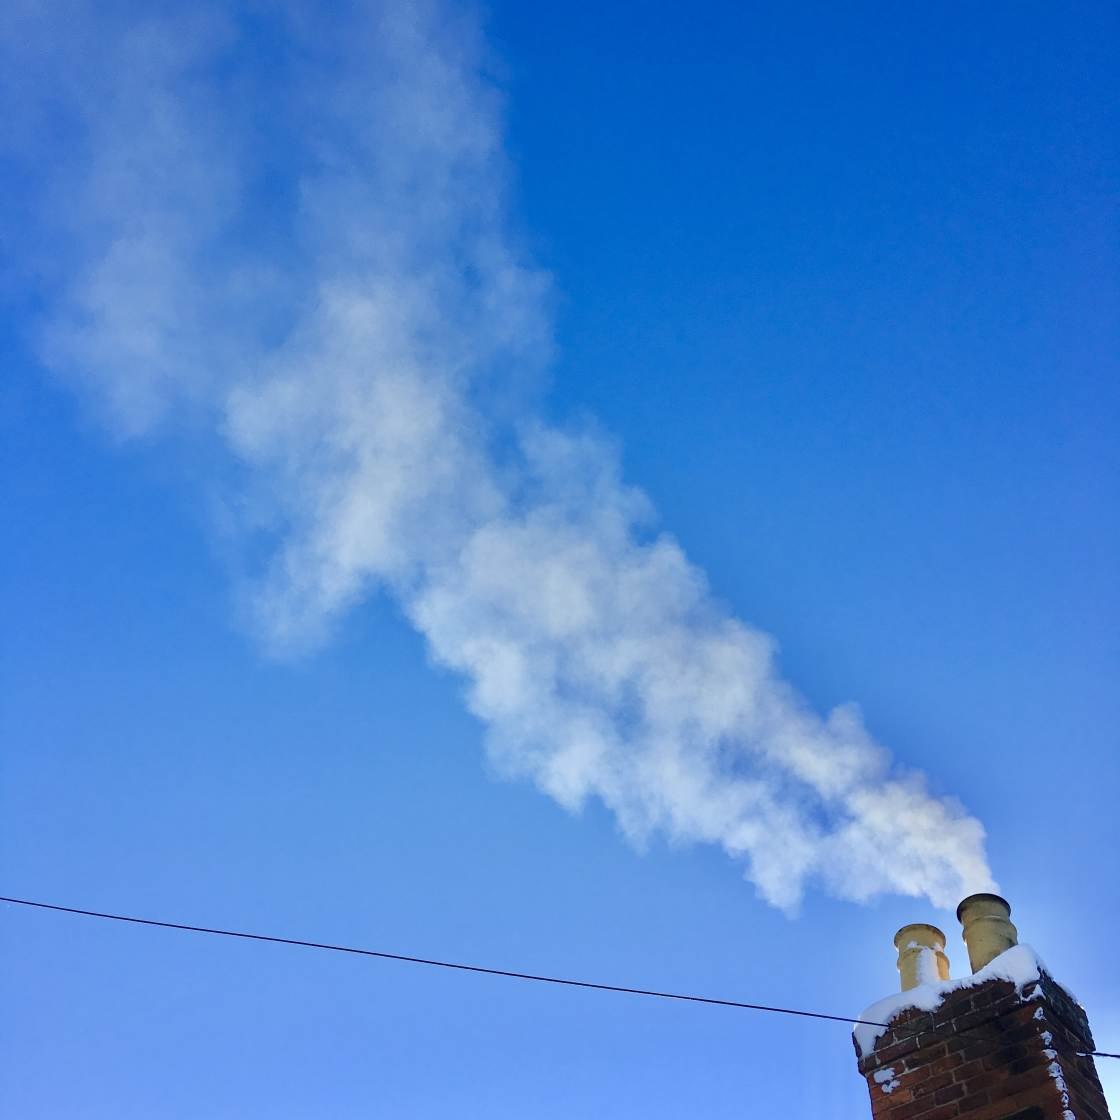
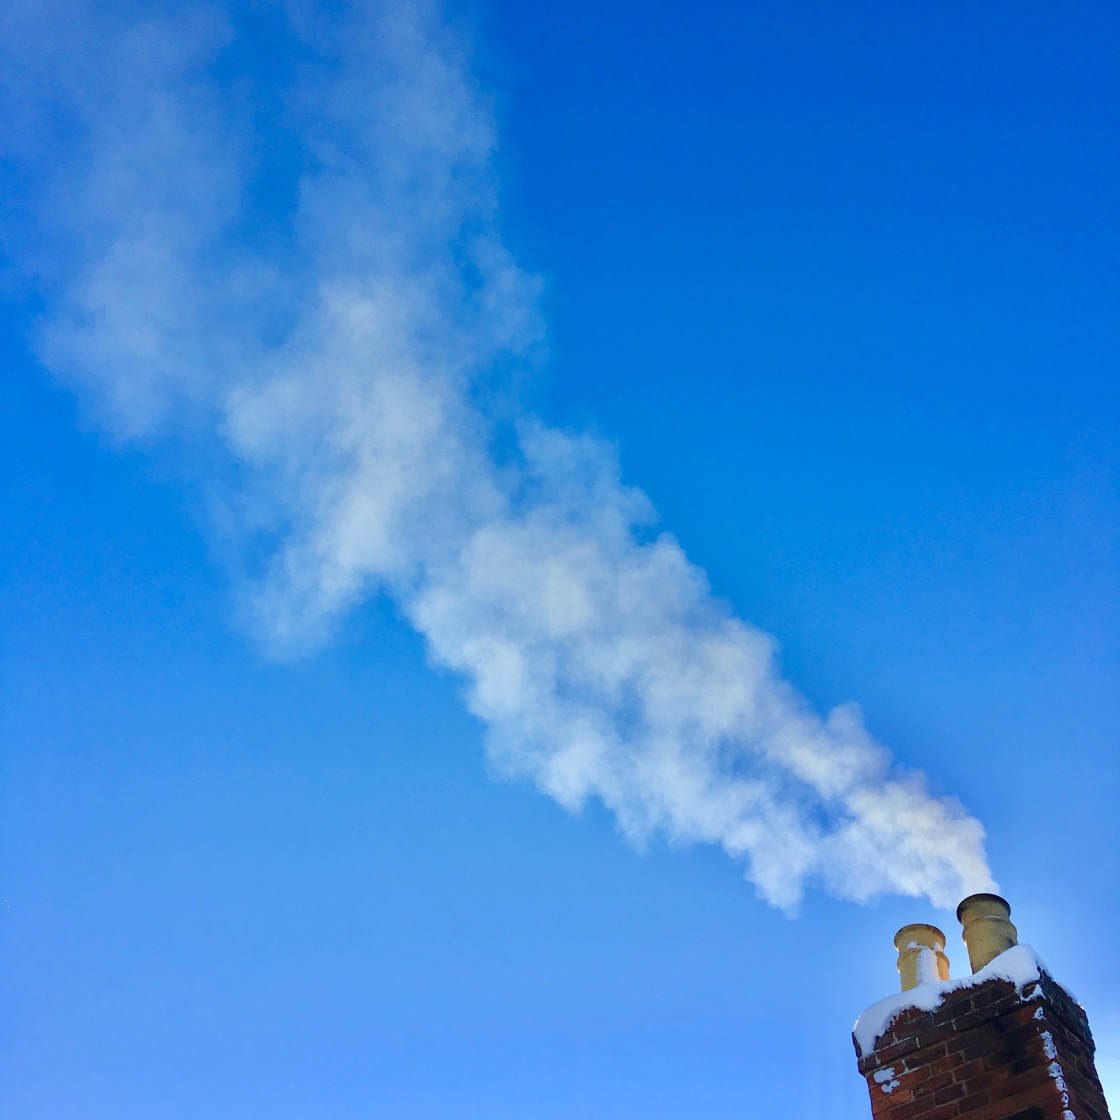
In the example below, the power line has been removed from the bottom part of the image. Removing the wire helped create a cleaner, minimalist composition.
To remove lines from a photo, open it in TouchRetouch.
Tap Line Removal at the bottom of the screen, then select the Line Remover tool.
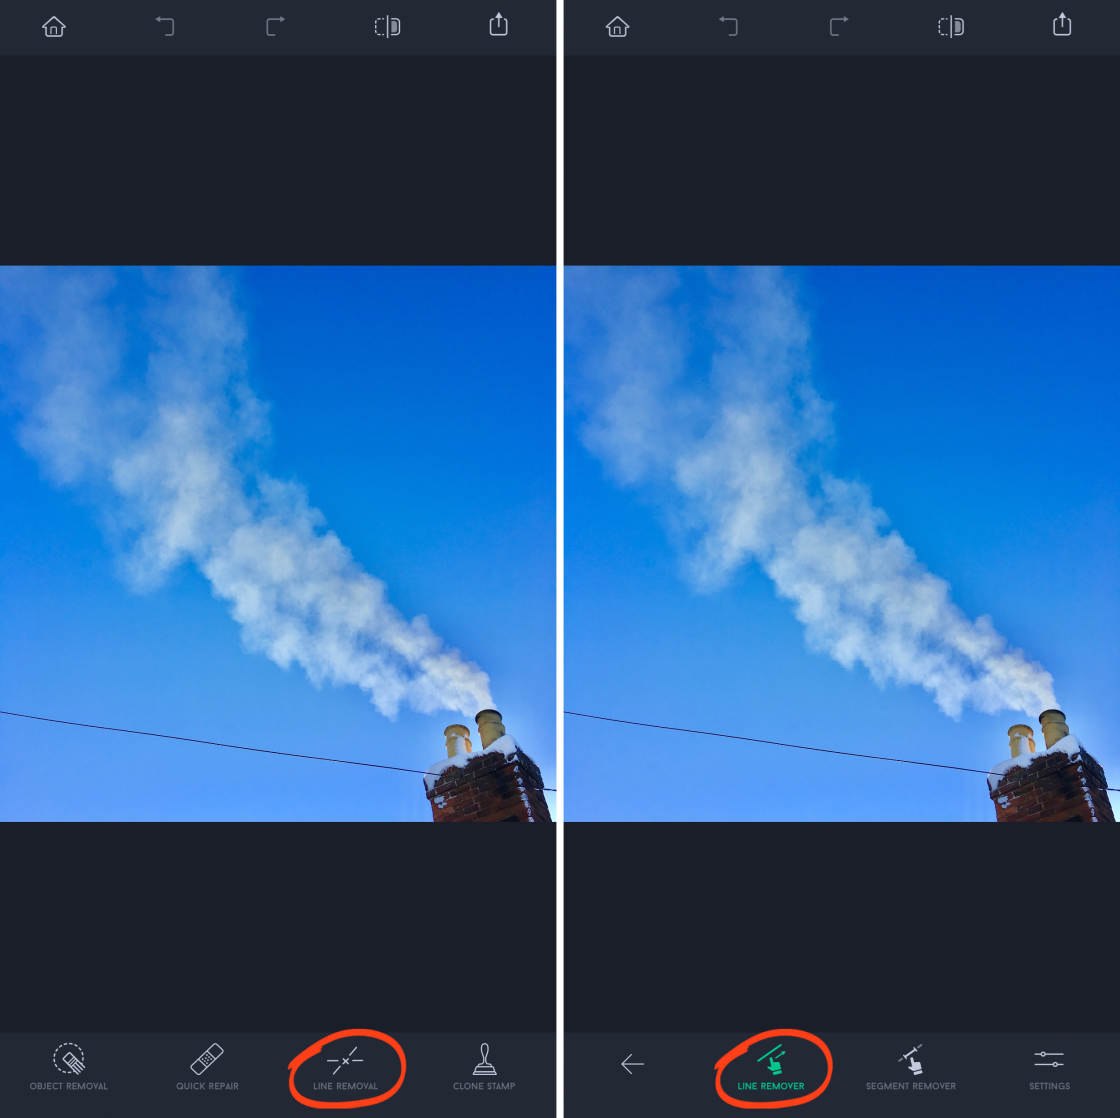
If you only want to remove a segment of a line, rather than the entire line, you'll need to selectSegment Remover instead.
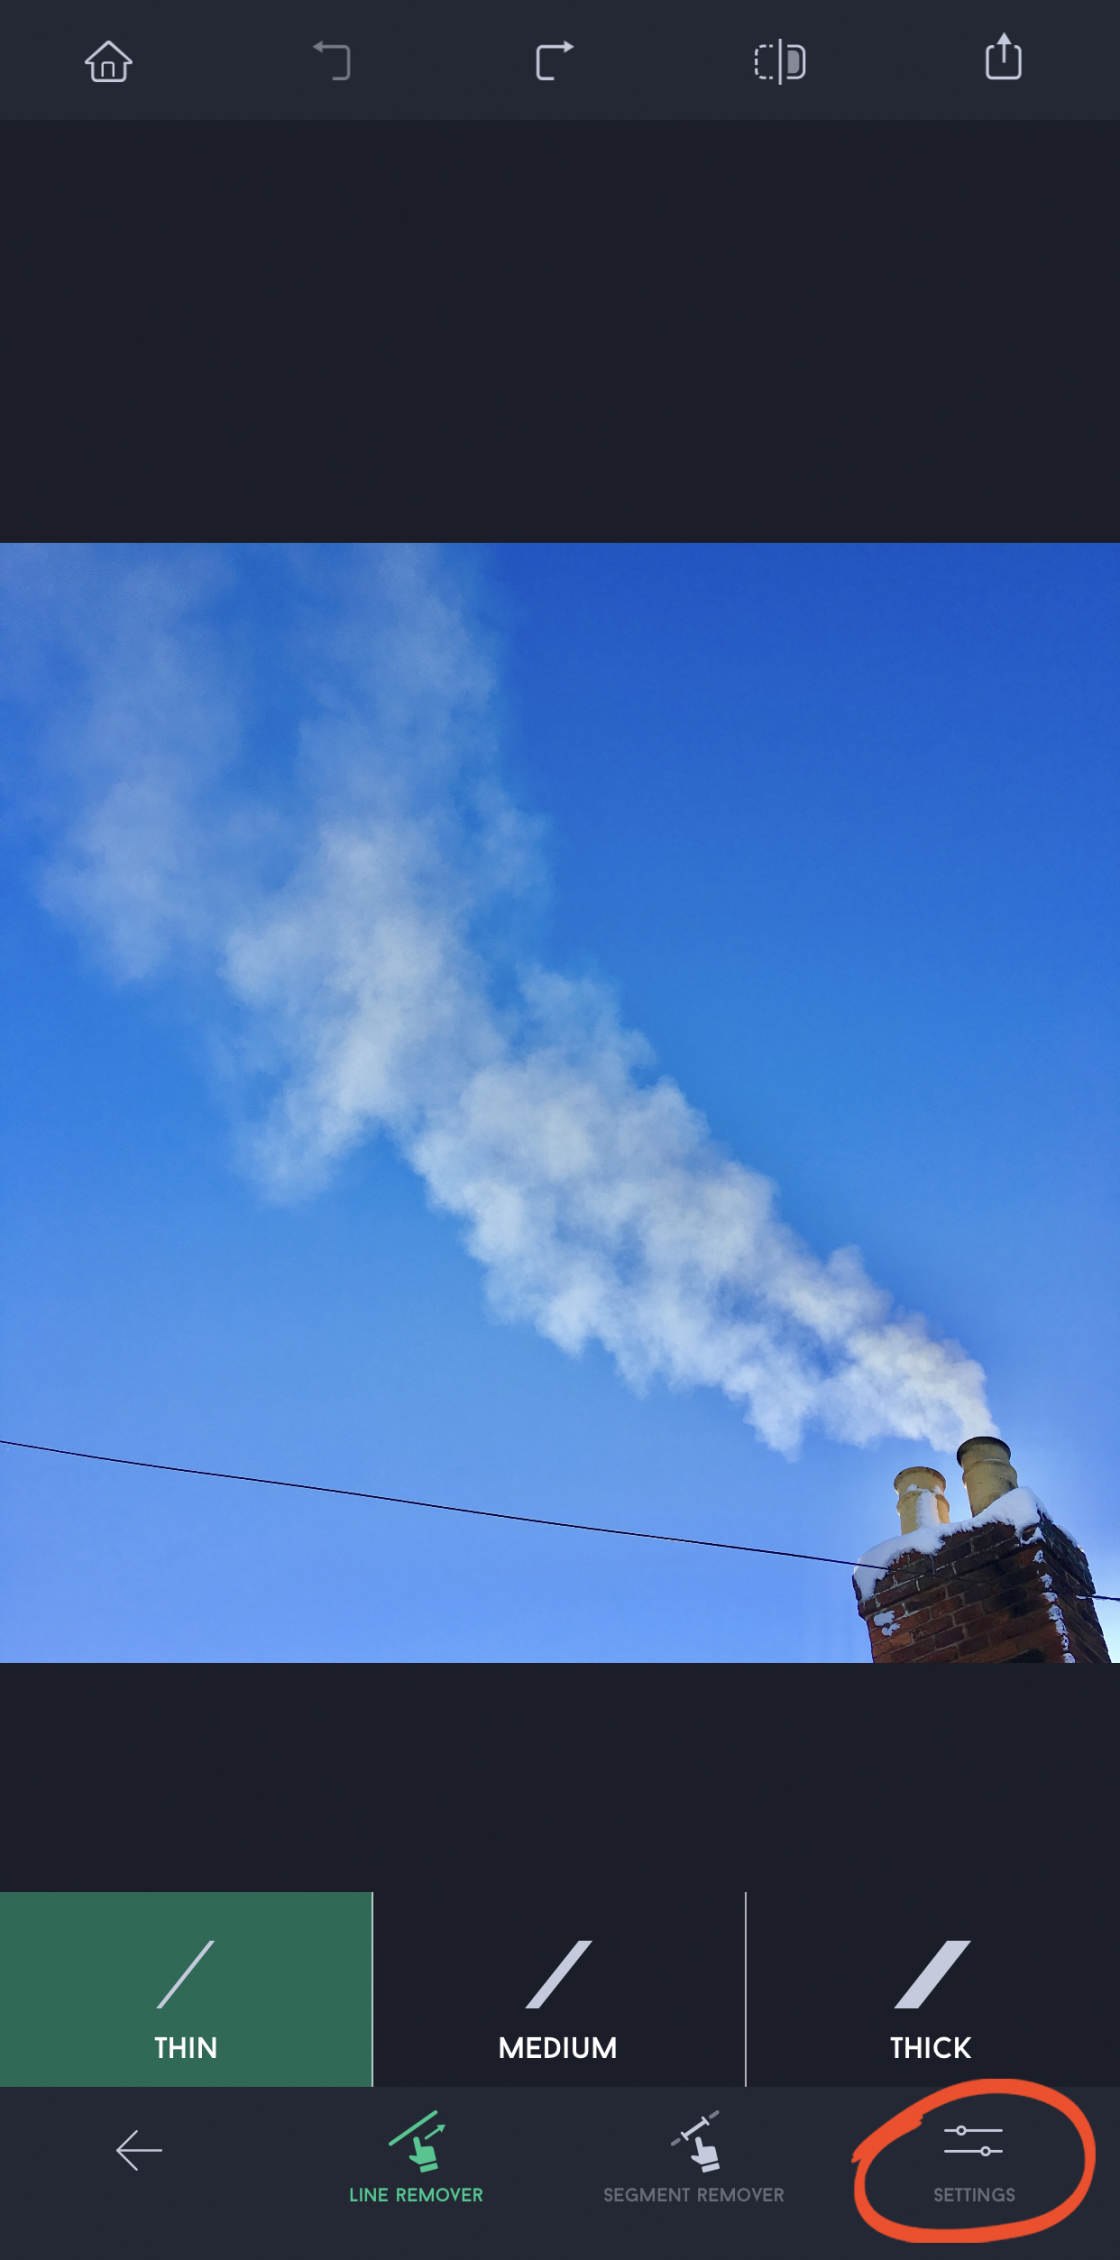
TapSettings at the bottom right, then select whether the line you want to remove isThin,Medium, orThick.
To remove a whole line, you only need to drag your finger over part of the line. There's no need to highlight the entire line. And you don't need to be precise as the app will find the line.
(Note that if you've selected the Segment Remover tool, you'll need to highlight the entire line segment to remove it).
As soon as you release your finger, the line will vanish from your photo!
If the line wasn't removed perfectly, tapUndo, then try selecting the line again.
When the line has been removed, don't forget to save your edit.
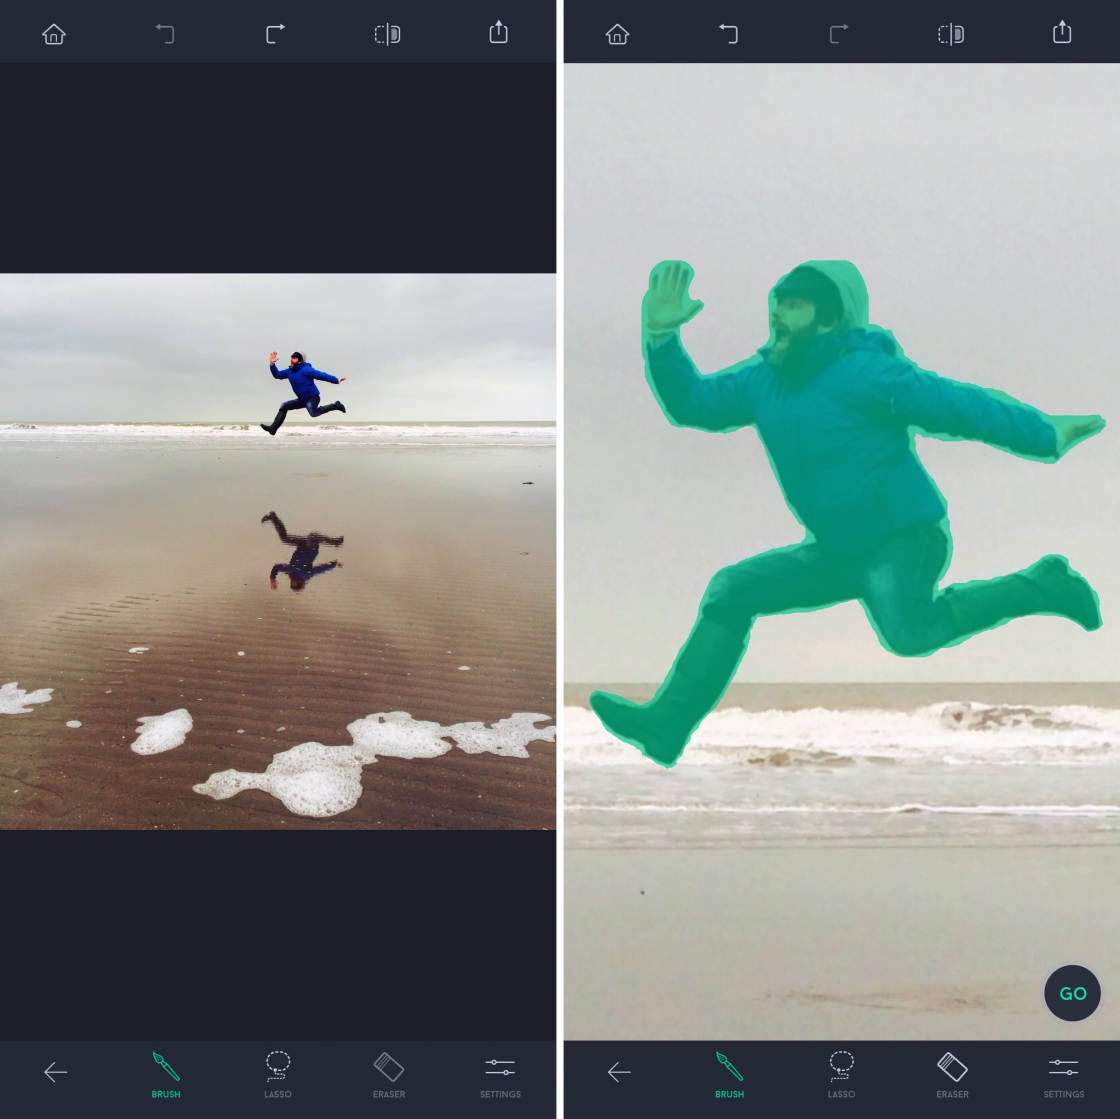
4. Remove Large Or Irregular-Shaped Objects
Is the object you want to remove large or complex in shape? If so, the tools we've covered so far might not be suitable.
But don't be put off by removing large or irregular-shaped objects!
The Object Removal tool lets you easily select complex shapes.
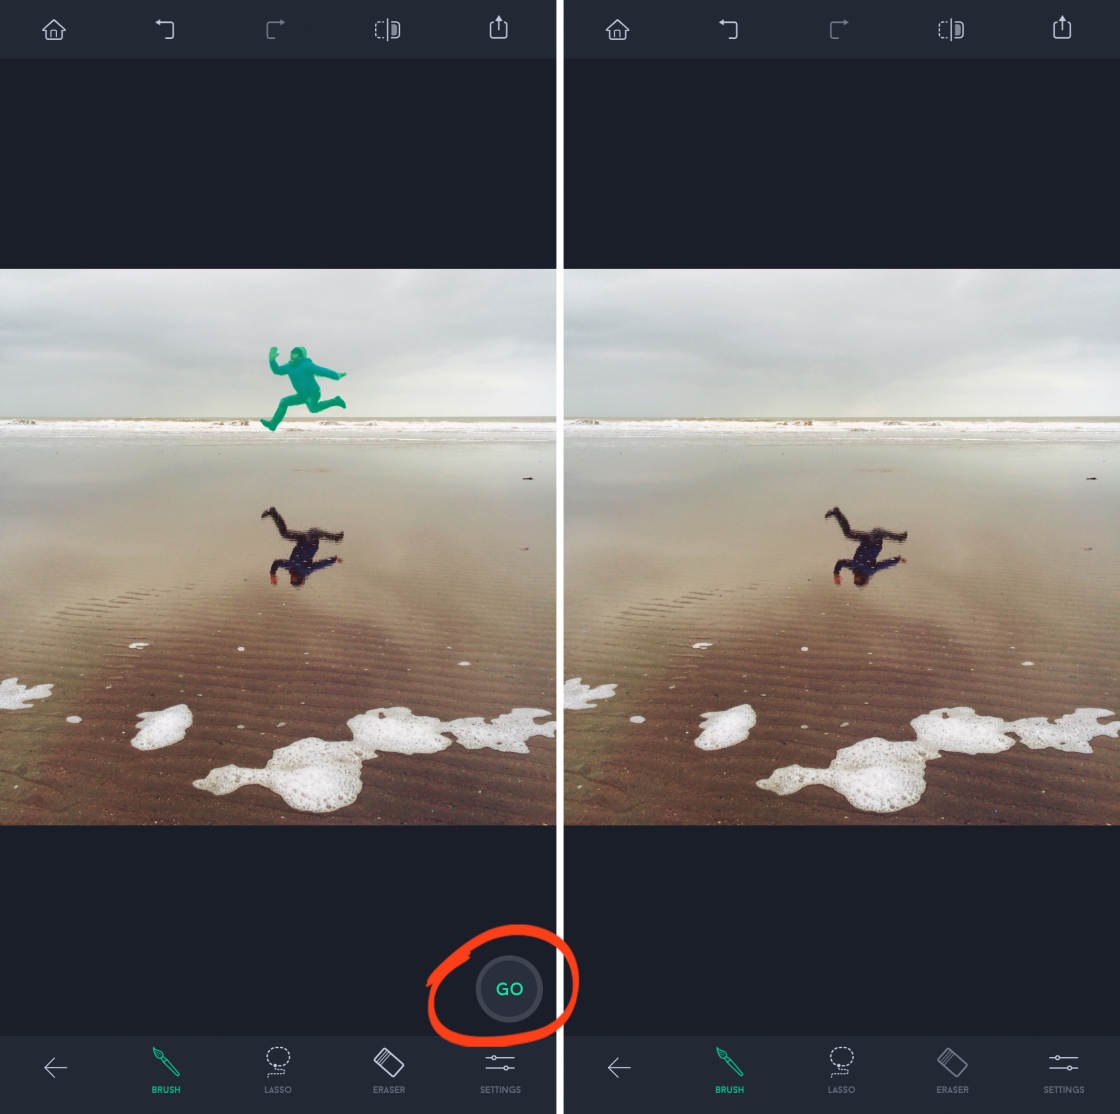
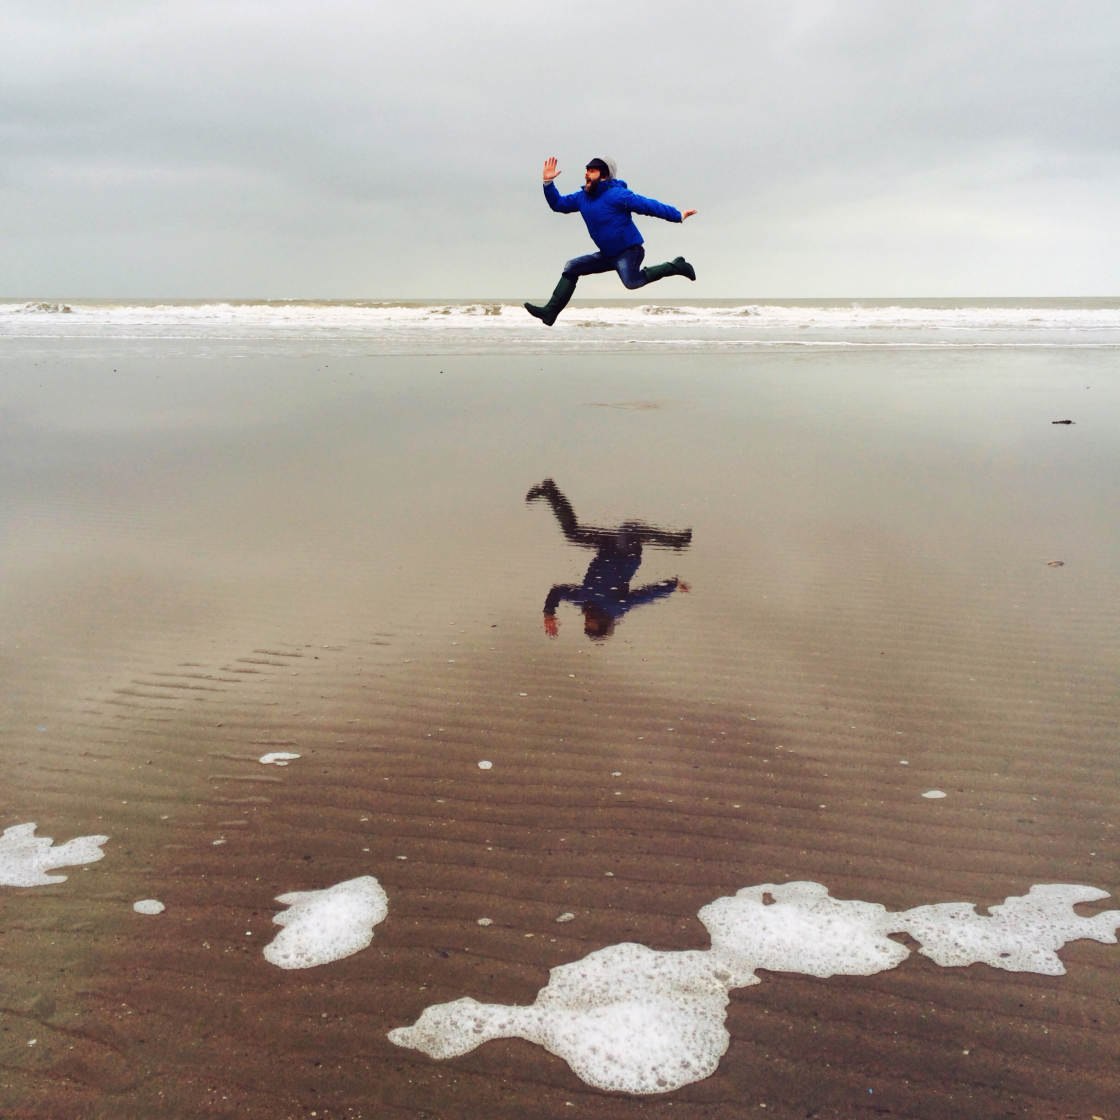
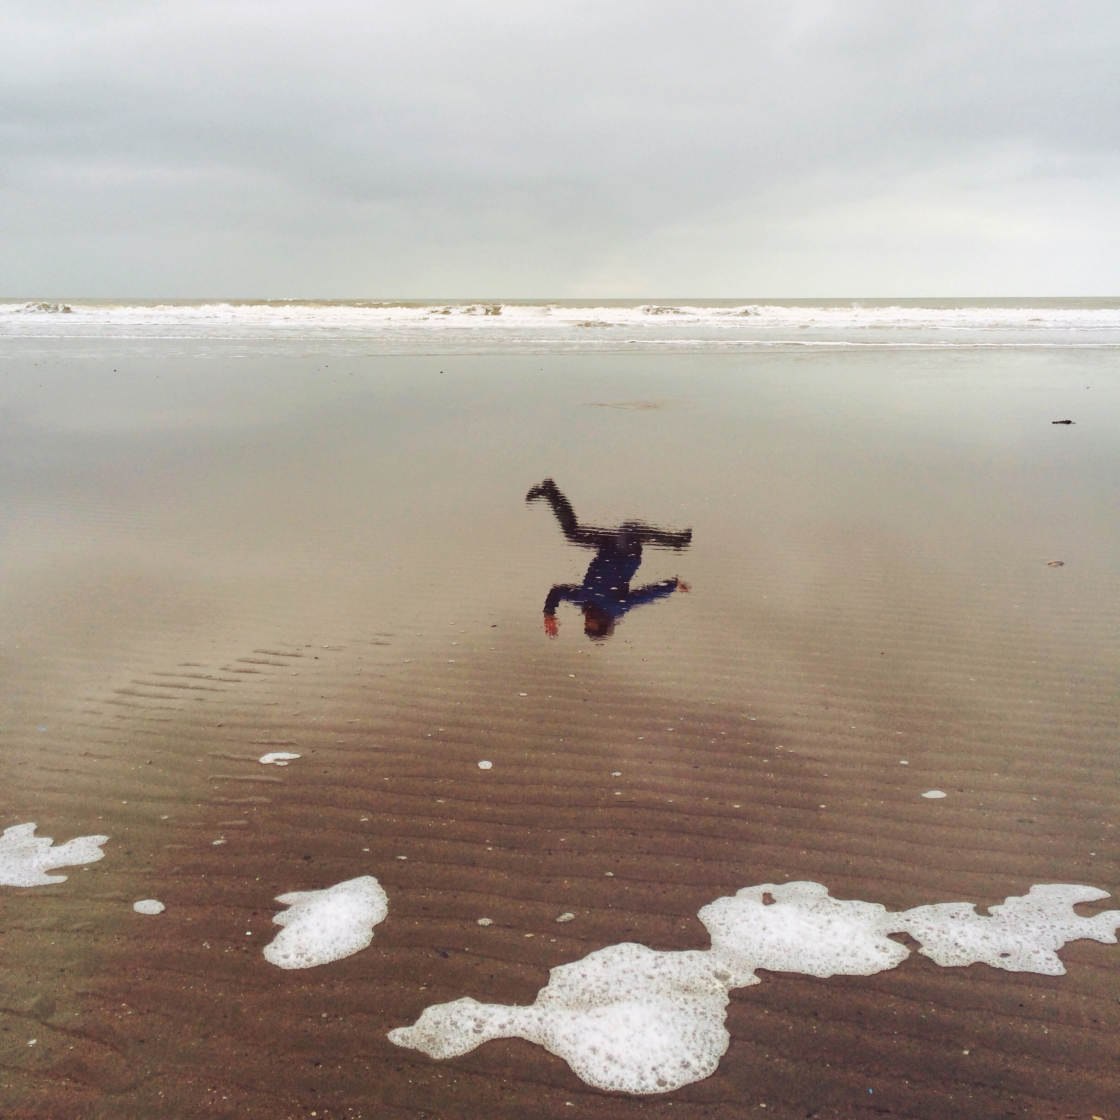
In the example below, I removed the jumping man from the photo. This left only his reflection, creating an intriguing and mysterious composition.
Open your image in TouchRetouch, and tap Object Removal. At the bottom of the screen, you'll see three tools for selecting your object: Brush, Lasso, and Eraser.
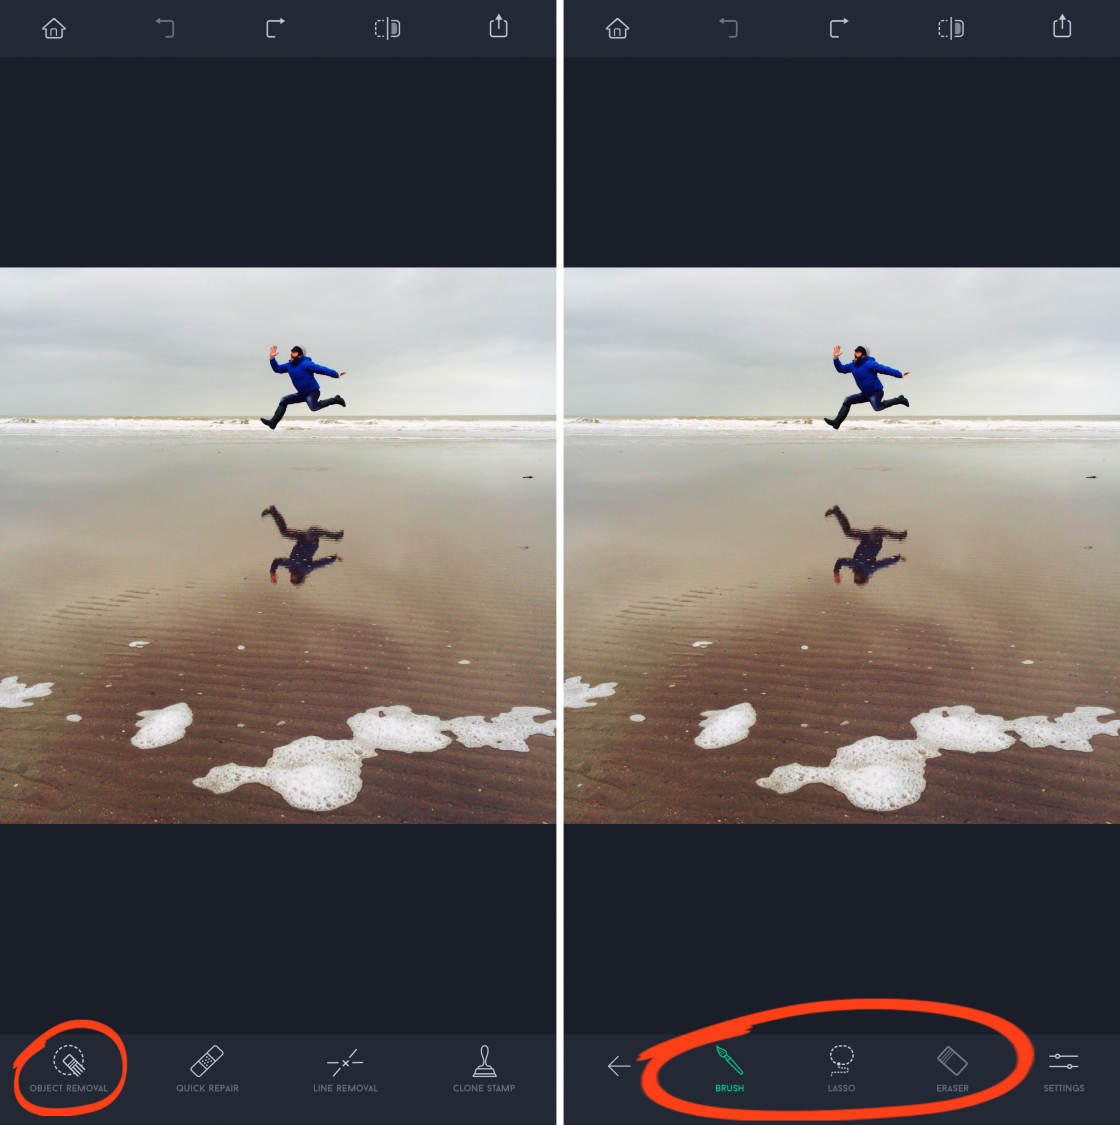
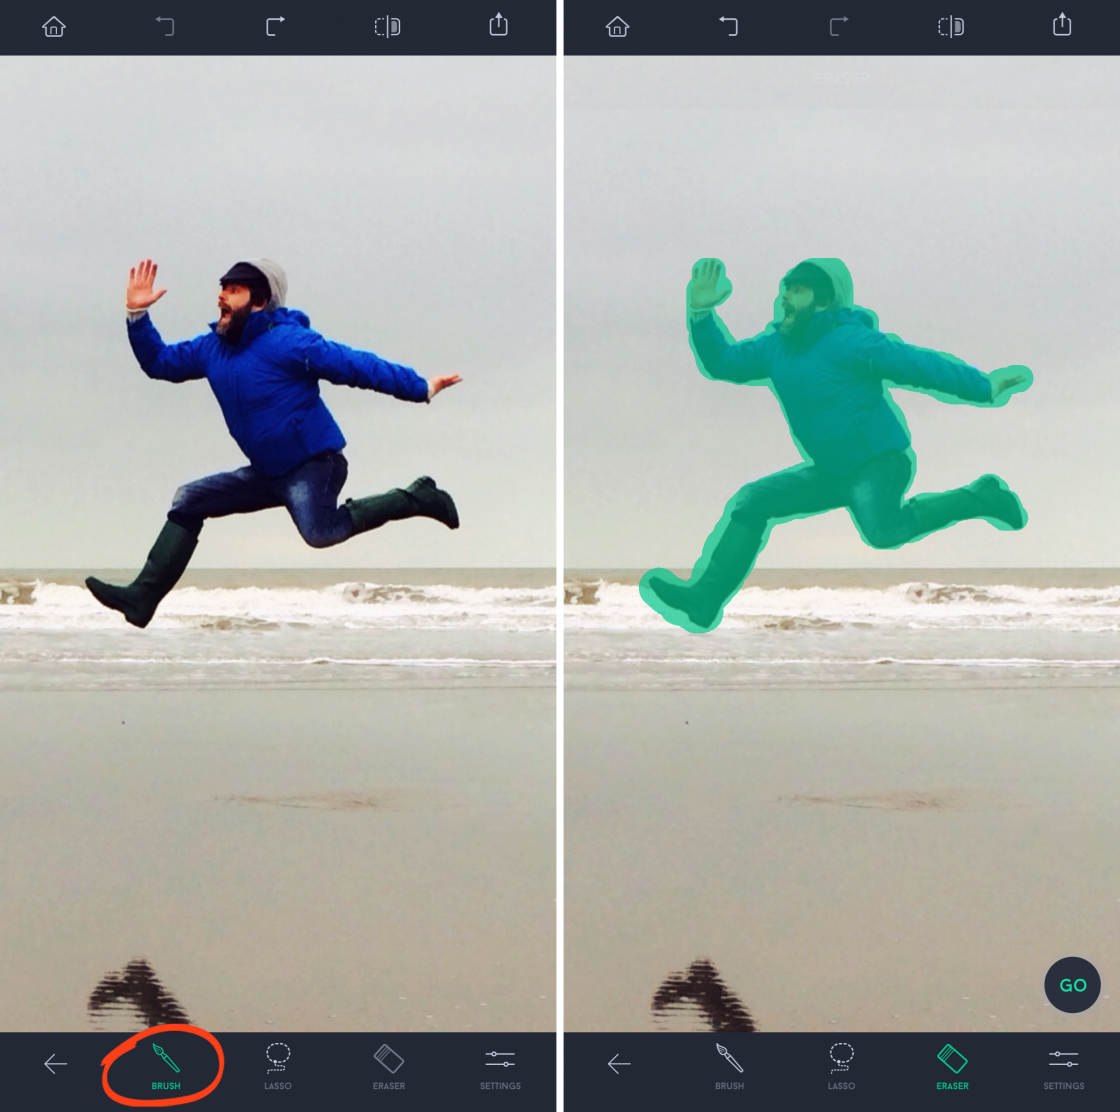
The Brush and Lasso tools are for selecting an object. The Eraser tool lets you deselect areas that you selected by mistake.
In most cases, the Brush tool is the best option for selecting your object.
Zoom in, then simply brush over the object you want to remove. Tap Settings if you need to adjust the brush size.
The Lasso tool works a bit differently. With this tool, you don't brush over the object.
Instead, you draw a continuous line around the edge of the object. When you release your finger, everything inside the lasso gets selected.
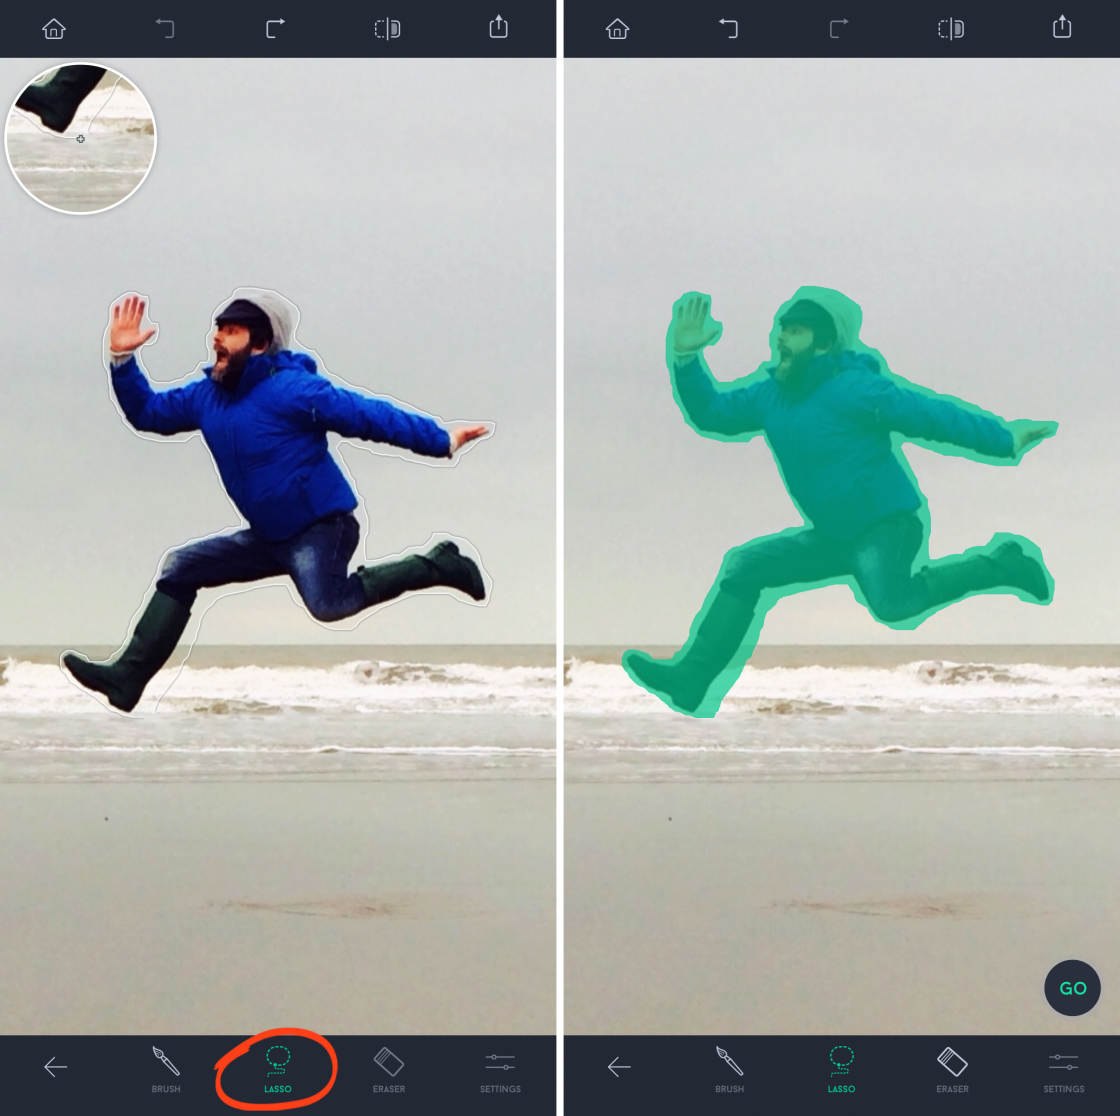
TheLasso tool is useful when your object is large. It means you don't have to brush your finger over the entire object.
Once you've selected the object, you should check your selection carefully. Zoom in and check around the edges.
If you made a mistake and selected too much of the background, don't worry! Simply switch to the Eraser tool and brush over the areas you want to deselect.
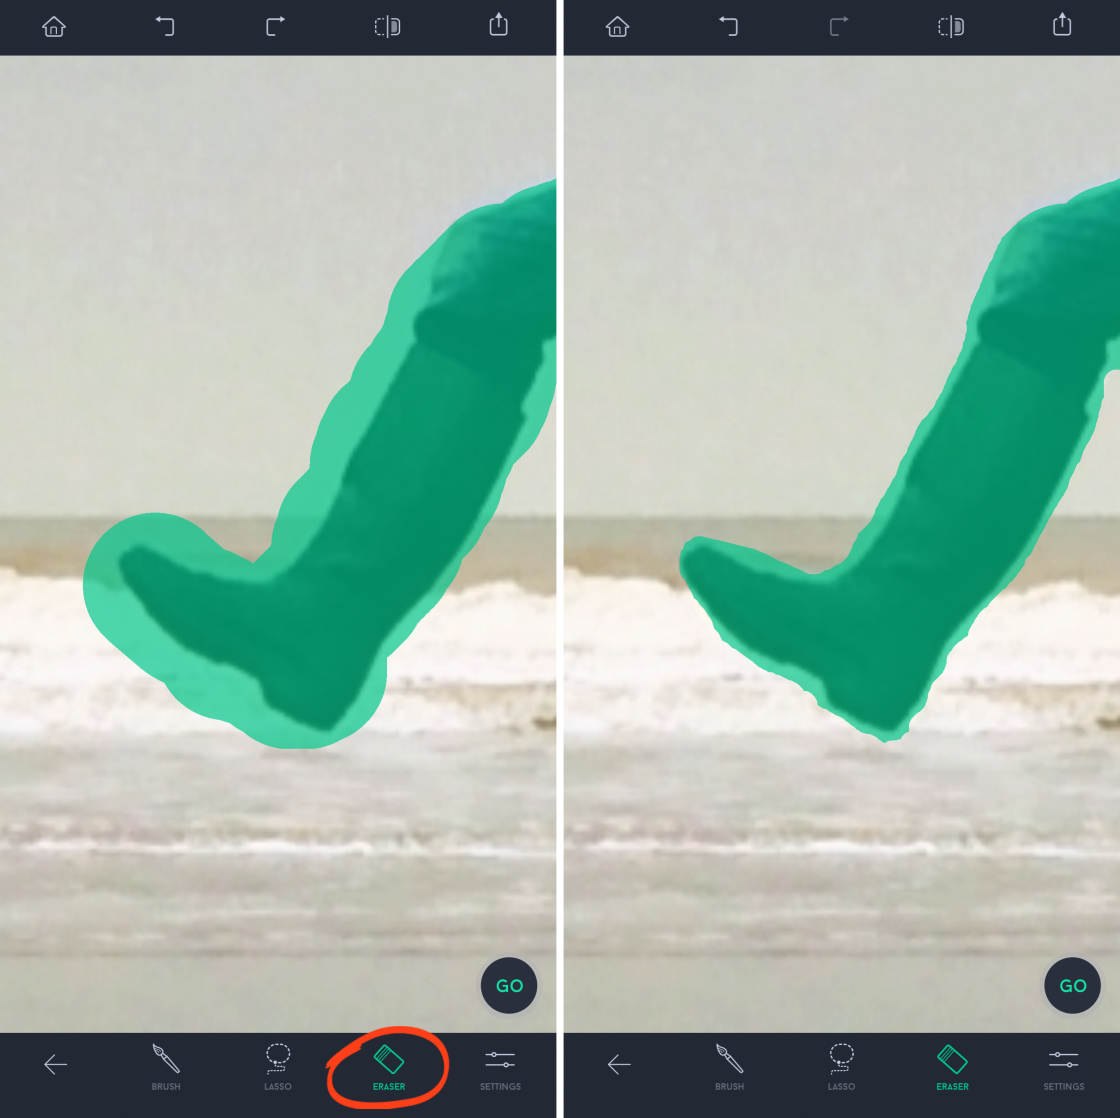
When you've made an accurate selection, tapGo at the bottom right. The selected object will disappear!
Finally, don't forget to save your edit when you're done.
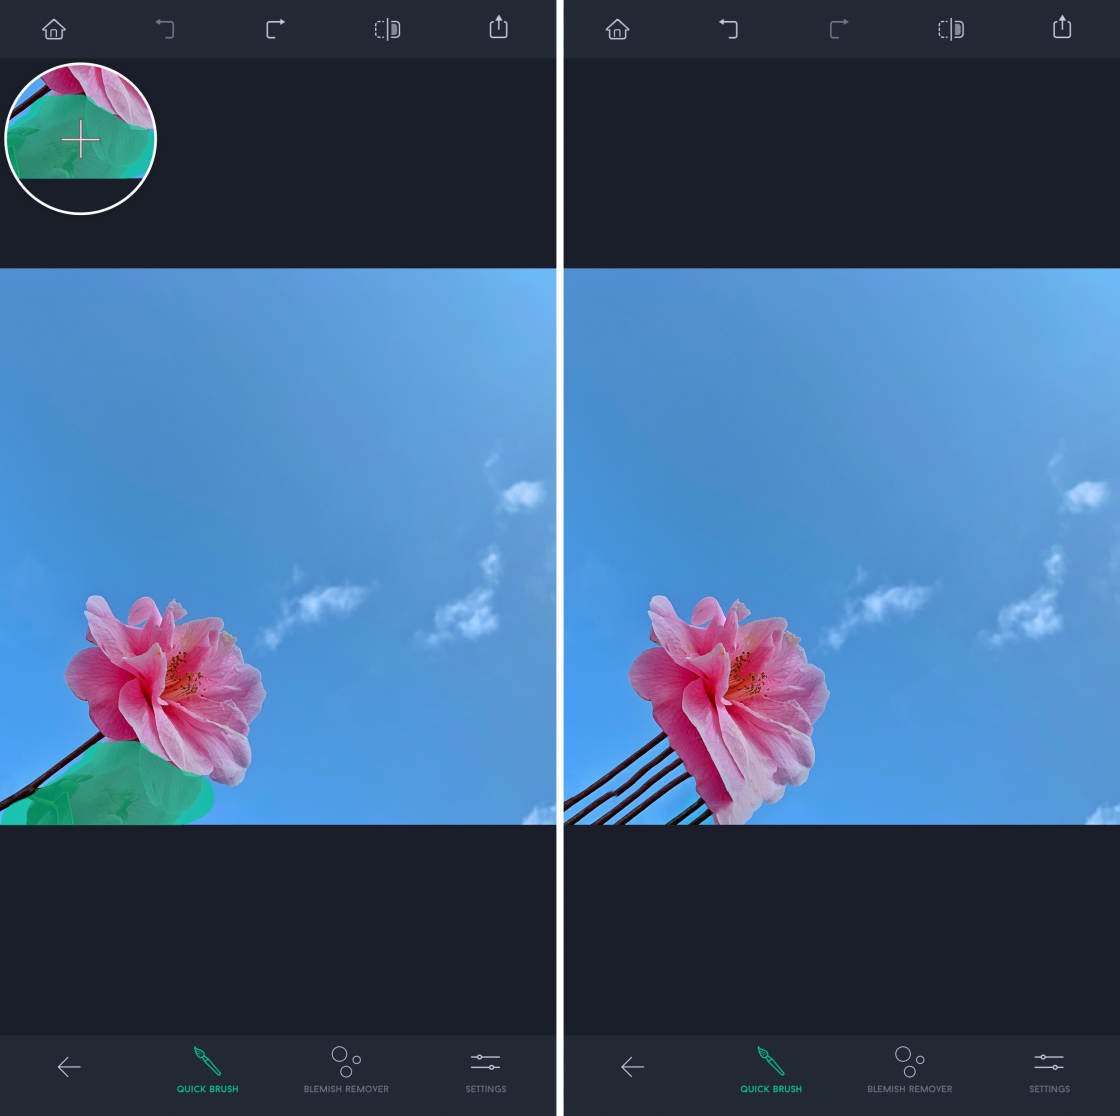
5. Clone Detail From One Area To Another
The final tool in TouchRetouch is theClone Stamp tool.
TheClone Stamp lets you manually copy pixels from one area to another.
This is different from the other tools which automatically replace an object with pixels from the surrounding area.
You can use the Clone Stamp to remove defects or repair a background that's been damaged by removing an object.
It's also handy for accurate object removal when the other retouch tools don't produce good results.
In the example below, I didn't get good results when I used the Object Removal tool to remove the lower flower. This was because the two flowers are right next to each other.

So I used the Clone Stamp to clone part of the blue sky over just the lower flower.

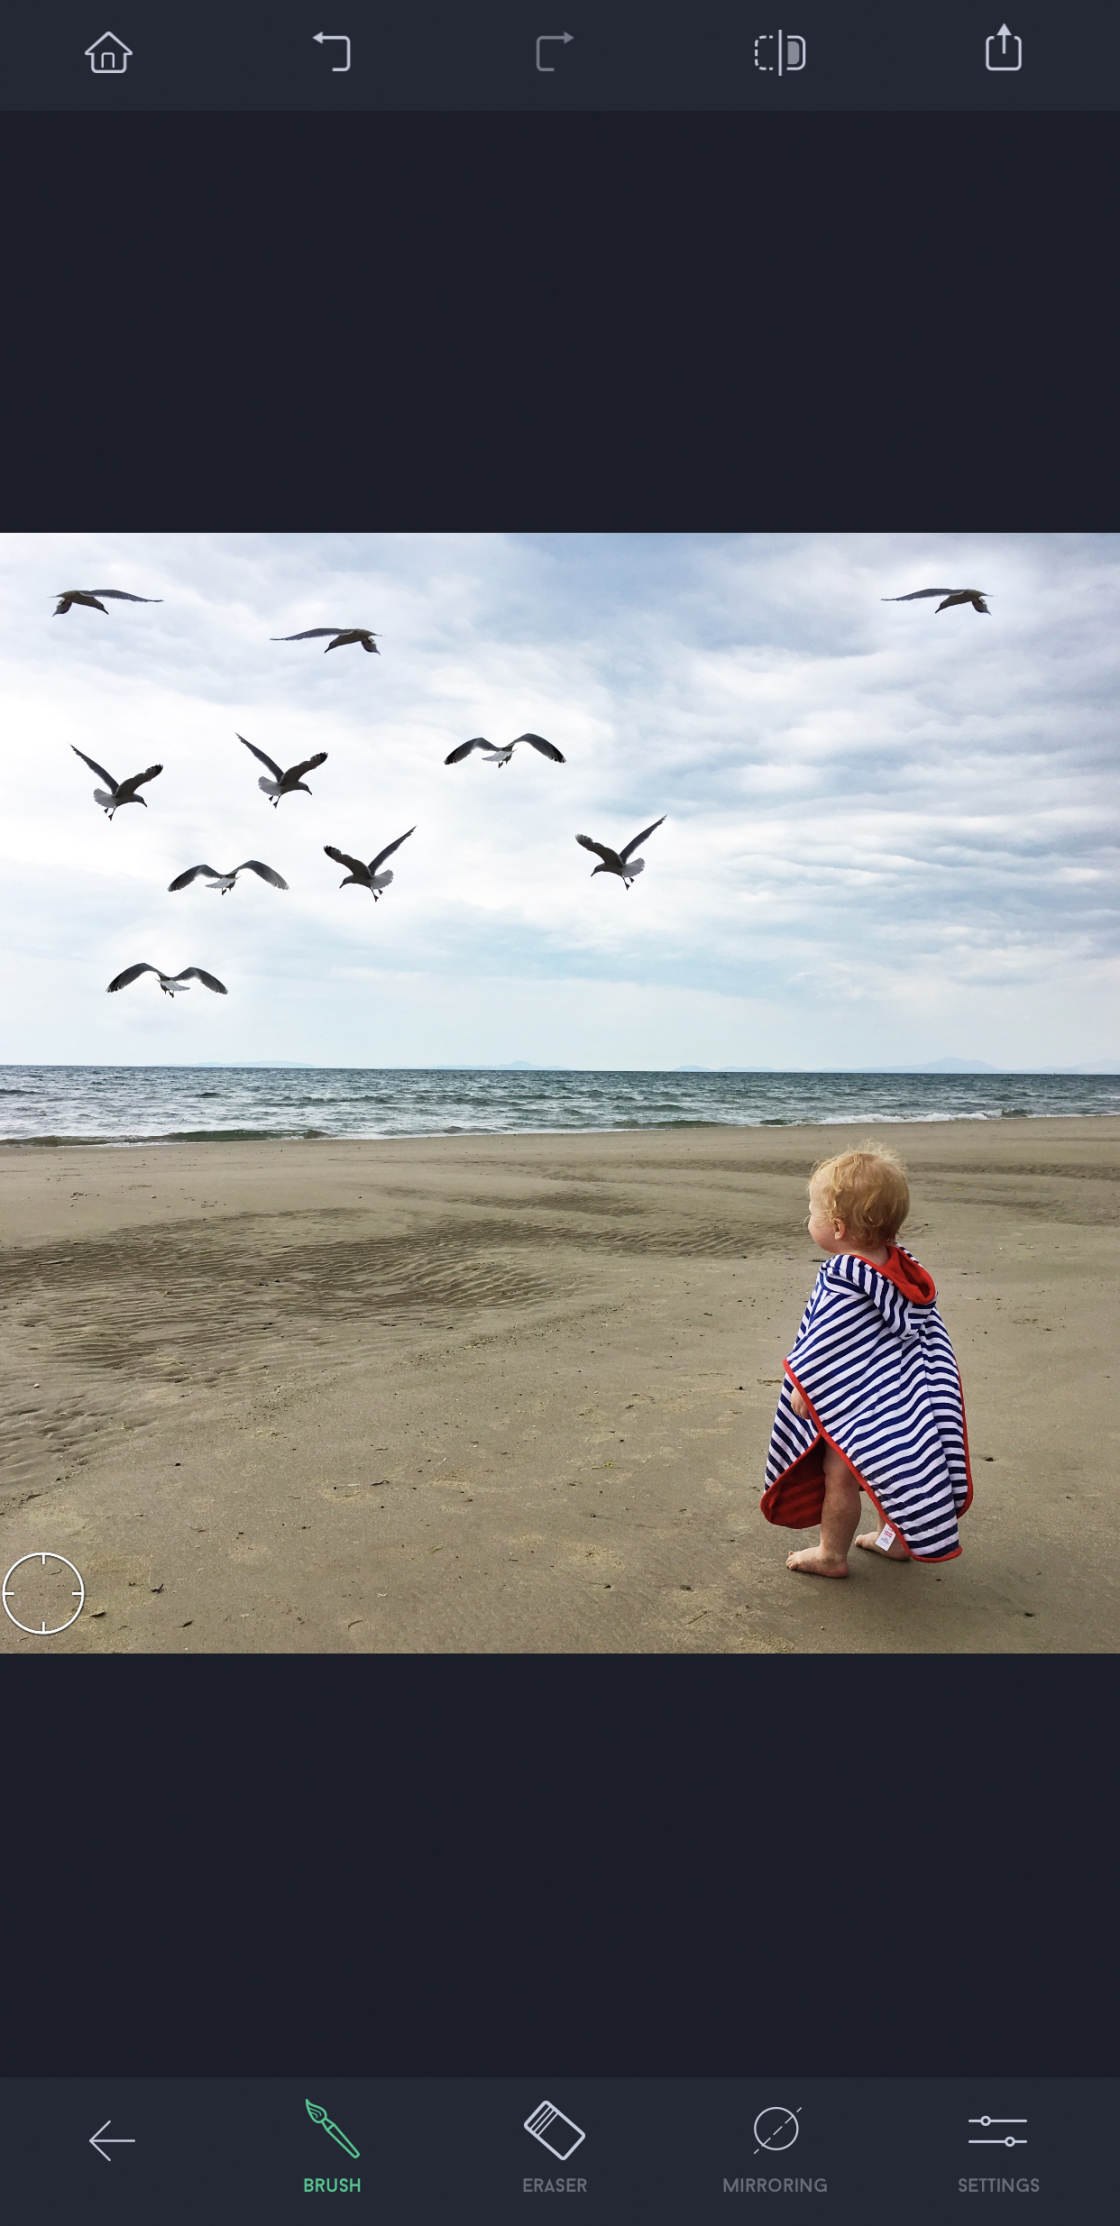
You can also use theClone Stamp to duplicate objects in a photo.
In the example below, I used theClone Stamp to duplicate the birds in the photo. The extra birds add more drama to the image.


Open your photo in TouchRetouch, and tap Clone Stamp. Ensure the Brush tool is selected at the bottom of the screen.
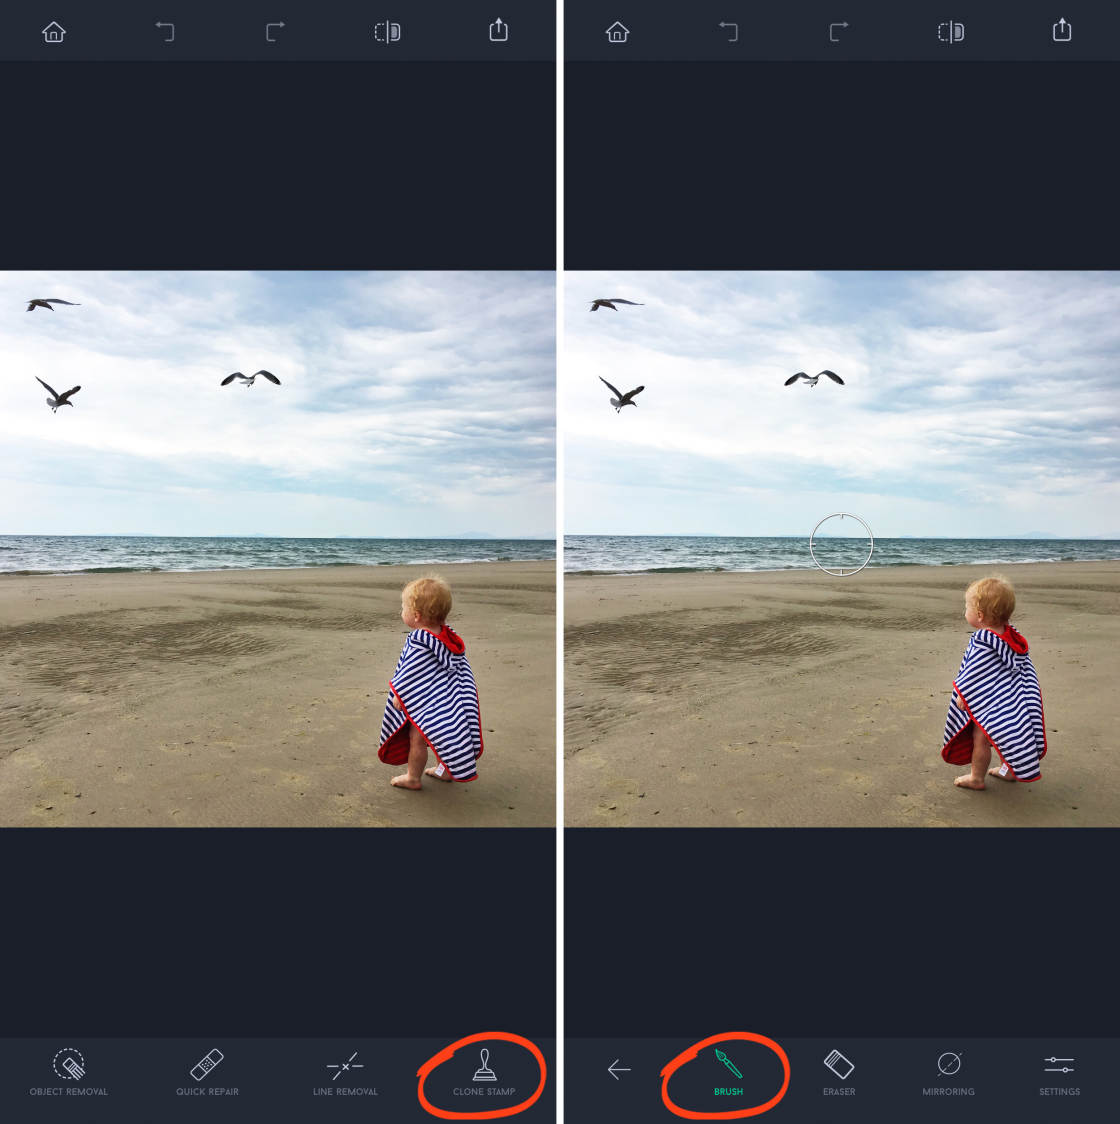
Tap on the object or area you want to duplicate (in this case, it's one of the birds). A circle indicates the "source point." If you want the cloned object to be mirrored horizontally, vertically, or diagonally, tap the Mirroring option.
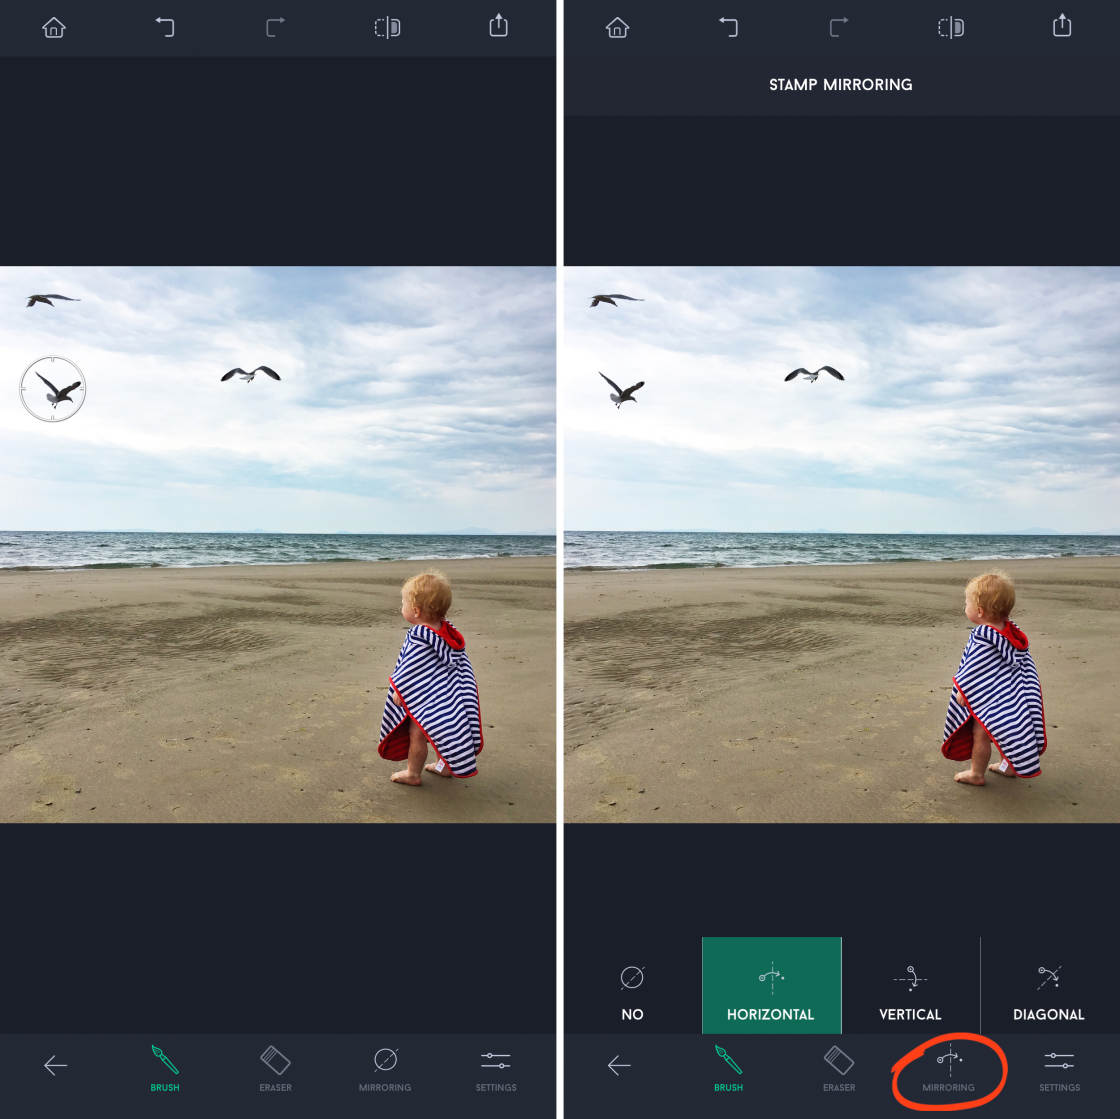
Now brush over the area where you want the cloned content to appear. As you brush, the pixels from the source point are copied to the area that you brush over.
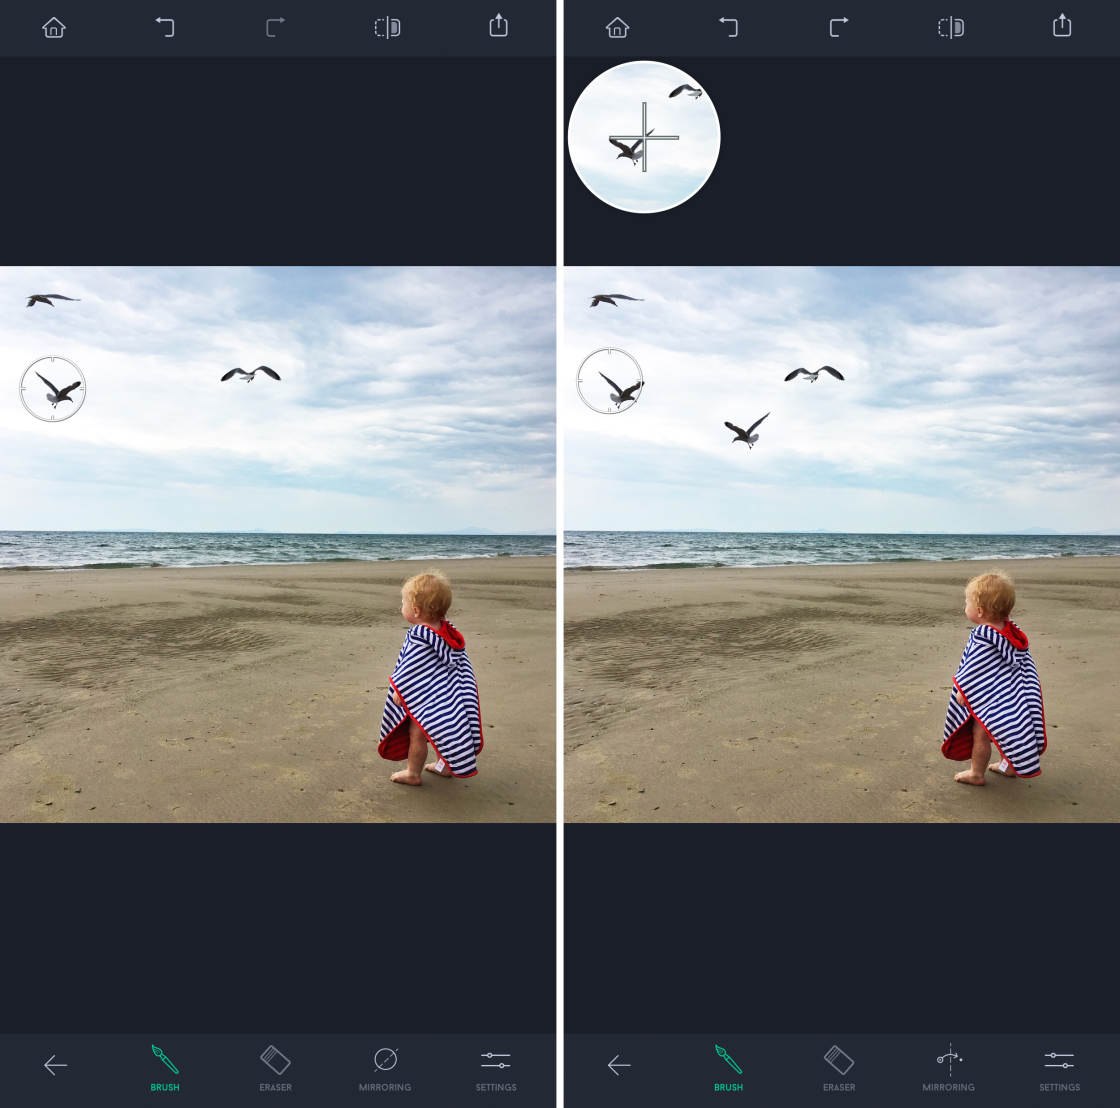
In the example above, the bird from the source point circle has been cloned to a different part of the photo. The duplicate bird is facing in the opposite direction because Mirroring was set toHorizontal.
If you're not happy with the result, tap Undo or use theEraser tool to erase the cloned object.
If you wish, keep repeating the above process to clone more objects within the image.
When you're happy with your edit, save the image.
6. Top Tips For Removing Objects Accurately
Knowing how to remove something from a picture will really expand your editing options.
But you have to take care to ensure you get realistic, accurate results.
Here are some top tips for getting perfect results every time!
6.1 Have Some Empty Space Around Your Object
Results are usually better when there's plenty of empty space around the object you want to remove.
Sky, water, snow, fields, and walls are all perfect backgrounds for removing objects.
When you remove the object, the pixels from the surrounding empty space will seamlessly replace the object.
But if there's too much detail around the object, it's more difficult (but not impossible!) to achieve realistic results.
6.2 Small Objects Are Easier To Remove Than Large Ones
The smaller the elements are, the easier it is to remove the imperfections.
Small objects can be selected quickly. And they usually have more empty space around them.
Removing large objects is perfectly possible, but you'll usually need to spend a bit more time removing them.
6.3 Zoom In On The Object
For accurate object removal, ensure you zoom in by pinching outwards with two fingers.
A closer view allows you to select the object more accurately.
The more accurate you are with your selection, the better the final result will be.
6.4 Use The Eraser For A More Accurate Selection
When selecting complex objects, don't forget to check the edges of your selection.
Then use the Eraser tool to deselect any areas of the background that shouldn't be selected.
Erasing areas that you selected by mistake will result in a better final result.
6.5 If It Doesn't Work Out, Try Again!
You might not always get perfect results on your first edit. But that doesn't mean you can't remove the object from your photo.
If it doesn't work out on the first go, tapUndo and try again.
Try brushing over a slightly different area of the object. Or try using a different retouch tool.
For images with complex objects or backgrounds, you might need to spend a bit more time editing.
But the results will be worth it!
As you can see, TouchRetouch is an amazing app for removing objects from your photos. And it offers incredible value for just $1.99.
If you'd prefer to try a free app to remove unwanted objects from a photo, check out our guide to the best photo retouch apps.
How To Get Rid Of The Square On Your Iphone
Source: https://iphonephotographyschool.com/removing-objects/
Posted by: dietzcorescoleat.blogspot.com
0 Response to "How To Get Rid Of The Square On Your Iphone"
Post a Comment